https://blogger.googleusercontent.com/img/b/R29vZ2xl/AVvXsEjtIwhfU9hN31oZq-g0biojjwbrQsBHV-Kbw-vv_mwqR7cmT7kS7anbCDv4VwUsBA_QWIJfYSHrYDPekwUhP62N7QhXG8OoChmjXGtJ2xN44e5kNdBDSe_bPoO4_SL_0ntOw76HXI2t5yw/s1600/bodypix2-twitter.gif
[Updated] BodyPix: Real-time Person Segmentation in the Browser with TensorFlow.js
Update
(November 18th, 2019)
BodyPix 2.0 has been released, with multi-person support and improved accuracy (based on ResNet50), a new API, weight quantization, and support for different image sizes.
Try the new demo live in your browser, and visit our GitHub repo.
 |
Multi-person support and improved accuracy (based on ResNet50) in BodyPix 2.0
|
Editors note: the original article from February 15th, 2019 follows below.
Posted by
Dan Oved, graduate student and researcher at ITP, NYU.
Tyler Zhu, engineer at Google Research. Editing: Irene Alvarado, creative technologist at Google Creative Lab.
We are excited to announce the release of
BodyPix, an open-source machine learning model which allows for person and body-part segmentation in the browser with
TensorFlow.js. With default settings, it estimates and renders person and body-part segmentation at 25 fps on a 2018 15-inch MacBook Pro, and 21 fps on an iPhone X.
What exactly is person segmentation? In computer vision, image segmentation refers to the technique of grouping pixels in an image into semantic areas typically to locate objects and boundaries. The BodyPix model is trained to do this for a person and twenty-four body parts (parts such as the left hand, front right lower leg, or back torso). In other words, BodyPix can classify the pixels of an image into two categories: 1) pixels that represent a person and 2) pixels that represent background. It can further classify pixels representing a person into any one of twenty-four body parts.
This might all make more sense if you try a live demo
here.
What can be done with person segmentation? This technology can be a tool for a wide range of applications from
augmented reality to
photography editing to
artistic effects on images or videos. It’s up to you! When we released
PoseNet last year (the first model ever that allowed for body estimation (what a Kinect does) in the browser using simple webcams), people came up with a
wide variety of
use cases for the technology. We hope the same kind of creative experimentation happens with BodyPix.
Why would you want to do this in the browser? Similar to the case of PoseNet, real-time person segmentation was only possible to do before with specialized hardware or hard-to-install software with steep system requirements. Instead both BodyPix and PoseNet can be used without installation and
just a few lines of code. You don’t need any specialized lenses to use these models —
they work with any basic webcam or mobile camera. And finally users can access these applications by just opening a url.
Since all computing is done on device, the data stays private. For all these reasons, we think BodyPix is
easily accessible as a tool for
artists, creative coders, and
those new to programming.
Before we do a deep dive of BodyPix, we want to thank
Tyler Zhu from Google Research who’s behind the model and working on human body pose estimation [
1,
2],
Nikhil Thorat and
Daniel Smilkov, the engineers on the Google Brain team behind the
TensorFlow.js library, and
Daniel Shiffman and the
Google Faculty Research Award for helping to fund Dan Oved’s work on this project, and
Per Karlsson from Google Research for rendering the simulation dataset.
Getting Started with BodyPix
Let’s dive into the technical details of using this model. BodyPix can be used to segment an image into pixels that are and are not part of a person. Those pixels that are part of a person can be further classified into one of twenty-four body parts. Importantly, the model works for a single person so make sure your input data does not contain multiple people.
Part 1: Importing the TensorFlow.js and BodyPix Libraries
Let’s go over the basics of how to set up a BodyPix project.
The library can be installed with: npm install @tensorflow-models/body-pix and then imported using es6 modules:
import * as bodyPix from '@tensorflow-models/body-pix';

async function loadAndUseBodyPix() {
   const net = await bodyPix.load();
   // BodyPix model loaded
}
Or via a bundle in the page, with nothing to install:
<html>
   <body>
        <!-- Load TensorFlow.js -->
        <script src="https://cdn.jsdelivr.net/npm/@tensorflow/tfjs@0.13.3"></script>
        <!-- Load BodyPix -->
        <script src="https://cdn.jsdelivr.net/npm/@tensorflow-models/body-pix"></script>
            bodypix.load().then(function(net) {
                // BodyPix model loaded
            });
        </script>
    </body>
</html>
Part 2a: Person Segmentation
 |
| Example person segmentation algorithm applied to an image. Image Credit: “Microsoft Coco: Common Objects in Context Dataset”, http://cocodataset.org |
At a basic level, person segmentation segments an image into pixels that are part of a person and those that are not. Under the hood, after an image is fed through the model, it gets converted into a two-dimensional image with float values between 0 and 1 at each pixel indicating the probability that the person exists in that pixel. A value called the “segmentation threshold” represents the minimum value a pixel’s score must have to be considered part of a person. Using the segmentation threshold, those 0–1 float values become binary 0s or 1s (ie. if the threshold is 0.5, any values over 0.5 are converted to 1s and any values below 0.5 are converted to 0s).
We call the API method
estimatePersonSegmentation to perform person segmentation on an image or video; this short code block shows how to use it:
const imageElement = document.getElementById('image');

// load the BodyPix model from a checkpoint
const net = await bodyPix.load();

// arguments for estimating person segmentation.
const outputStride = 16;
const segmentationThreshold = 0.5;

const personSegmentation = await net.estimatePersonSegmentation(imageElement, outputStride, segmentationThreshold);
An example output person segmentation looks like:
{
  width: 640,
  height: 480,
  data: Uint8Array(307200) [0, 0, 0, 0, 0, 0, 0, 0, 0, 0, 0, 0, 0, 1, 1, 1, 0, 0, 0, 0, 0, 0, 0,    0, 0, 0, 0, 0, 0, 0, 0, 1, 1, 1, 1, 0, 0, 0, 0, 0, 0, 0, 0, 0, 0, 0, 0, 0, 0, 0, 0, 0, 0, 0, 0, 0, 0, 0, 0, 0, 0, 0, 1, 1, 1, 1, 1, 1, 1, 1, 0, 0, 0, 0, 0, 0, 0, 0, 0, 0, 0, 0, 0, 0, 0, 0, 0, 0, 0, 0, 0, 0, 0, 0, 0, 1, 1, 1, 0, …]
}
// the data array contains 307200 values, one for each pixel of the 640x480 image that was passed to the function.
For a full explanation of this method and its arguments, refer to the
github readme.
Drawing the Person Segmentation Output
Another benefit of BodyPix being in the browser is that we have access to web APIs such as
Canvas Compositing. We use this to mask or replace parts of images using the outputs from BodyPix. We’ve provided utility functions that wrap this functionality to get you started:
toMaskImageData takes the output from estimating person segmentation and generates a transparent image that, depending on the argument maskBackground, will be opaque either where the person or background is. This can then be drawn as a mask on top of the original image using the method
drawMask:
const imageElement = document.getElementById('image');

const net = await bodyPix.load();
const segmentation = await net.estimatePersonSegmentation(imageElement);

const maskBackground = true;
// Convert the personSegmentation into a mask to darken the background.
const backgroundDarkeningMask = bodyPix.toMaskImageData(personSegmentation, maskBackground);

const opacity = 0.7;

const canvas = document.getElementById('canvas');
// draw the mask onto the image on a canvas.  With opacity set to 0.7 this will darken the background.
bodyPix.drawMask(
    canvas, imageElement, backgroundDarkeningMask, opacity);
drawMask draws an image onto a canvas and draws with a specified opacity an ImageData containing a mask on top of it.
 |
| With the output from estimatePersonSegmentation on the first image above, toMaskImageData will produce an ImageData that either looks like the second image above if maskBackground is set to true (by default), or the third image if maskBackground is set to false. |
|
 |
This mask can then be drawn on top of the image using drawMask. |
Part 2b: Body Part segmentation
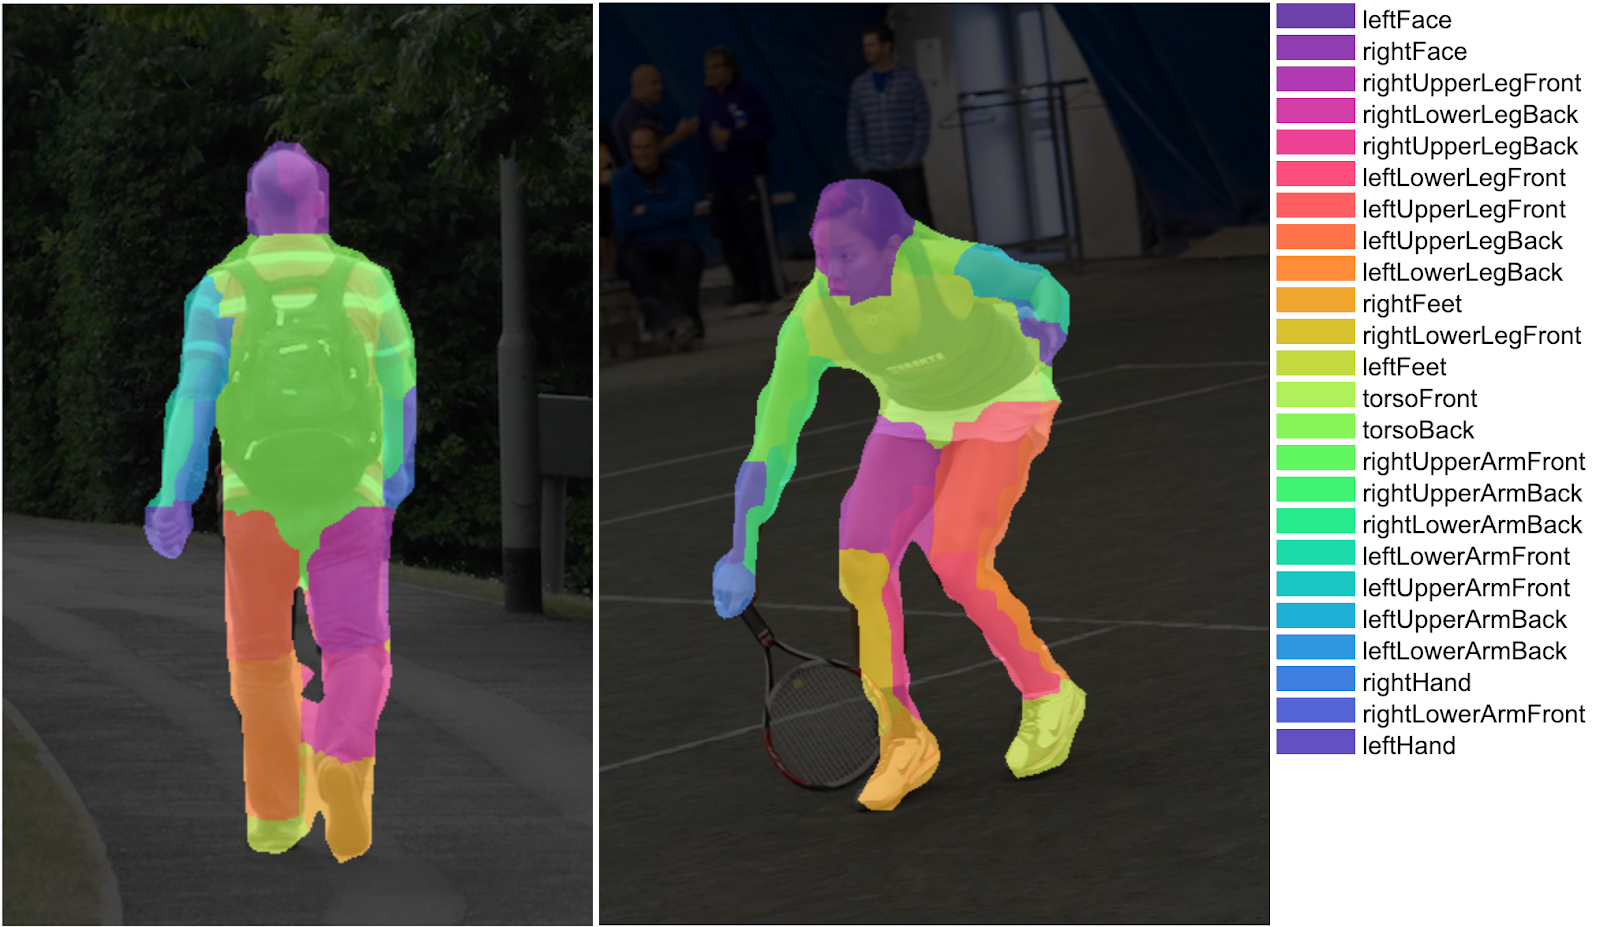 |
| Example body-part segmentation algorithm applied to images. Image Credit: “Microsoft Coco: Common Objects in Context Dataset”, https://cocodataset.org |
Beyond the simple person/no-person classification, BodyPix can segment an image into pixels that represent any of
twenty-four body parts. After an image is fed through the model, it gets converted into a two-dimensional image with integer values between 0 and 23 at each pixel indicating which of the 24 body parts that pixel belongs to. Pixels that are outside of the body have a value of -1.
We call the API method
estimatePartSegmentation to perform body part segmentation on an image or video; this short code block shows how to use it:
const imageElement = document.getElementById('image');

// load the BodyPix model from a checkpoint
const net = await bodyPix.load();

// arguments for estimating body part segmentation.
const outputStride = 16;
const segmentationThreshold = 0.5;

// load the person segmentation model from a checkpoint
const net = await bodyPix.load();

const partSegmentation = await net.estimatePartSegmentation(imageElement, outputStride, segmentationThreshold);
An example output body part segmentation looks like:
{
  width: 680,
  height: 480,
  data: Int32Array(307200) [-1, -1, -1, -1, -1, -1, -1, -1, -1, -1, -1, -1, -1, -1, -1, -1, -1, -1, -1, -1, 3, 3, 3, 3, -1, -1, -1, -1, -1, -1, -1, -1, -1, -1, -1, -1, -1, -1, -1, 0, 0, 0, 0, 0, 1, 1, 2, -1, -1, -1, -1, -1, -1, -1, -1, -1, -1, -1, -1, -1, -1, -1, -1, -1, -1, 15, 15, 15, 15, 16, 16, -1, -1, -1, -1, -1, -1, -1, -1, -1, -1, -1, -1, -1, -1, -1, -1, -1, -1, 23, 23, 23, 22, 22, -1, -1, -1, -1,  …]
}
// the ‘data’ array contains 307200 values, one for each pixel of the 640x480 image that was passed to the function.
For a full explanation of this method and its arguments, refer to the
github readme.
Drawing the Body Part Segmentation Output
With the output of estimatePartSegmentation, and an array of colors indexed by part id,
toColoredPartImageData generates an image with the corresponding color for each part at each pixel. This can then be drawn as a mask on top of the original image onto a canvas using the method
drawMask:
const imageElement = document.getElementById('person');

const net = await bodyPix.load();
const partSegmentation = await net.estimatePartSegmentation(imageElement);

const rainbow = [
  [110, 64, 170], [106, 72, 183], [100, 81, 196], [92, 91, 206],
  [84, 101, 214], [75, 113, 221], [66, 125, 224], [56, 138, 226],
  [48, 150, 224], [40, 163, 220], [33, 176, 214], [29, 188, 205],
  [26, 199, 194], [26, 210, 182], [28, 219, 169], [33, 227, 155],
  [41, 234, 141], [51, 240, 128], [64, 243, 116], [79, 246, 105],
  [96, 247, 97],  [115, 246, 91], [134, 245, 88], [155, 243, 88]
];

// the colored part image is an rgb image with a corresponding color from the rainbow colors for each part at each pixel.
const coloredPartImage = bodyPix.toColoredPartImageData(partSegmentation, rainbow);
const opacity = 0.7;

const canvas = document.getElementById('canvas');
// draw the colored part image on top of the original image onto a canvas.  The colored part image will be drawn semi-transparent, with an opacity of 0.7, allowing for the original image to be visible under.
bodyPix.drawMask(
    canvas, imageElement, coloredPartImageData, opacity);
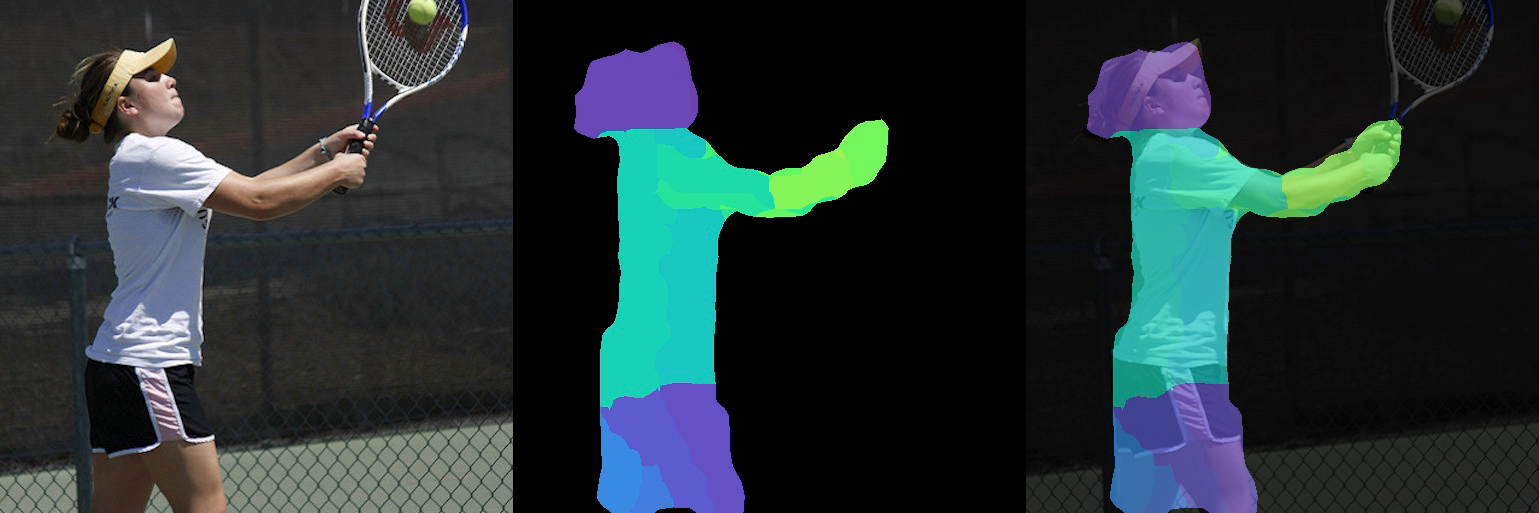 |
| With the output from estimatePartSegmentation on the first image above, and a provided color scale, toColoredPartImageData will produce an ImageData that looks like the second image above. The colored part image can be drawn on top of the original image with an opacity of 0.7 onto a canvas using drawMask; the result is shown in the third image above. |
Refer to the github
readme for detailed explanations of these methods and how to use them.
How to make BodyPix run faster or more accurately
The model size and output stride have the biggest effects on performance and accuracy — they can either be set to values that make BodyPix run faster but less accurately or more accurately but slower.
- The model size is set when loading the model, with the argument
mobileNetMultiplier, and can have values of 0.25, 0.50, 0.75, or 1.00. The value corresponds to a MobileNet architecture and checkpoint. The larger the value, the larger the size of the layers, and more accurate the model at the cost of speed. Set this to a smaller value to increase speed at the cost of accuracy.
- The output stride is an argument that is set when running segmentation, and can have values of 8, 16, or 32. At a high level, it affects the accuracy and speed of the pose estimation. The lower the value of the output stride the higher the accuracy but slower the speed, the higher the value the faster the prediction time but lower the accuracy.
Additionally, the size of the original image will also have an effect on the performance. Since after estimating segmentation the results are scaled to the original image size, the larger the original image the more computation needs to happen when scaling and drawing the results. To make things faster, try scaling down the image before feeding it to the api.
This is a great place to stop if you’re looking to start tinkering with BodyPix. For those curious to learn how we created the model, the next section goes into more technical detail.
The Making of BodyPix
BodyPix uses the convolutional neural network algorithm. We trained both a ResNet model and a MobileNet model. Although the ResNet based model is more accurate, this blog post concerns the MobileNet one which has been open-sourced for its ability to run efficiently on mobile devices and the standard consumer computers. For the MobileNet model, the traditional classification model’s last pooling and fully connected layer has been replaced by a 1x1 convolution layer in order to predict a dense 2D segmentation map. Below is an illustration of what happens when MobileNet is used to process an input image:
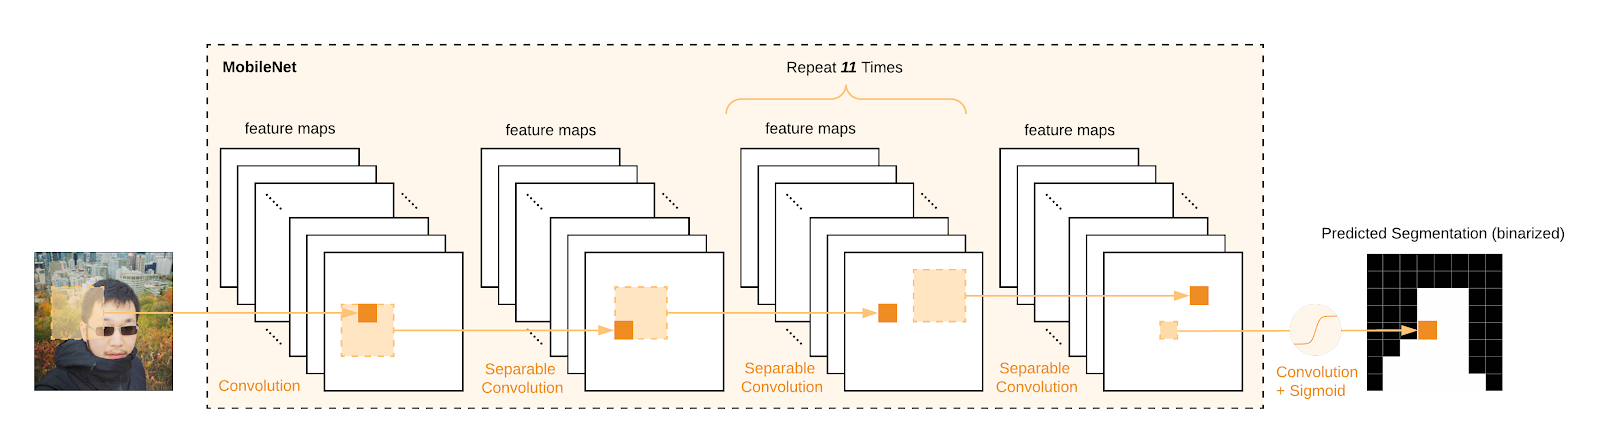 |
| Example that shows MobileNet’s layer-by-layer activations from input image to output layer (feature maps downsampling omitted for the illustration purpose) |
Person Segmentation
At the core of BodyPix is an algorithm that performs body segmentation — or, in other words, performs a binary decision for each pixel of an input image to estimate whether that pixel belongs to a person or not. Let’s go through how this works:
 |
| Images that show the task of segmenting the person region can be formulated as a per-pixel binary decision task. 1 indicates that a pixel belongs to the person region and 0 indicates that a pixel does not belong to the person region (Segmentation resolution has been reduced for illustration purpose). |
An image is fed through the MobileNet network, and the sigmoid activation function is used to transform the output to a value between 0 and 1, which can be interpreted as the probability of whether a pixel belongs to a person or not. A segmentation threshold (e.g. 0.5) converts this to a binary segmentation by determining the minimum value a pixel’s score must have to be considered part of a person.
 |
| Example data representation of the person segmentation algorithm applied to an image. From left to right: an input image, the network’s segmentation prediction after sigmoid, and the binary segmentation after thresholding. Illustration by Ashley Jane Lewis. Image Credit: “Microsoft Coco: Common Objects in Context Dataset”, https://cocodataset.org |
Body Part Segmentation
To estimate the body part segmentation, we use the same MobileNet representation, but this time repeat the above process by predicting an additional twenty-four channel output tensor P where twenty-four is the number of body parts. Each channel encodes the probability of a body part being present or not.
 |
| An example that shows the task of segmenting person body part regions can be formulated as a multi-channel per-pixel binary decision task. For each body part channel, 1 indicates that a pixel belongs to the body part region and 0 indicates that a pixel does not belong to the body region (from left to right: an input image, right face channel and left face channel). |
 |
| Example that shows MobileNet’s layer-by-layer activations from input image to the additional 24-channel body-part segmentation output (feature maps downsampling omitted for the illustration purpose). |
Example that shows MobileNet’s layer-by-layer activations from input image to the additional 24-channel body-part segmentation output (feature maps downsampling omitted for the illustration purpose).
Since for each image position, there are twenty-four channels in the output tensor P, we need to find the optimal part among the twenty-four channels. During inference, for each pixel position (u, v) of the output body part tensor P, we select the best body_part_id with the highest probability using the following formula:
This results in a two-dimensional image (the same size as the original image), with each pixel containing an integer indicating which body part the pixel belongs to. The person segmentation output is used to crop the person from this full image by setting the values to -1 where the corresponding person segmentation output is less than the segmentation threshold.
 |
| Example shows how we combine 24-channel body-part segmentation and person segmentation into 1 — channel part id output. Illustration by Ashley Jane Lewis. Image Credit: “Microsoft Coco: Common Objects in Context Dataset”, https://cocodataset.org |
 |
| Examples that show the final 1-channel body part id output after combing 24-channel body part masks using the argmax formula described above and cropping out the person region using person segmentation (each body_part_id is indicated by a unique color and the output resolution is reduced for illustration purpose). |
Training with Real and Simulation Data
It is time-consuming to manually annotate a large amount of training data for the task of segmenting pixels in an image into twenty four body part regions. Instead, we internally use computer graphics to render images with ground truth body part segmentation annotations. To train our model, we mixed the rendered images and real COCO images (with 2D keypoints and instance segmentation annotations). Using the mixing training strategy and a multi-task loss, our ResNet model is able to learn the twenty four body part prediction capability purely from simulated annotations. Finally, we distilled the teacher ResNet model’s prediction on COCO images into our student MobileNet model for BodyPix.
 |
| An example that shows how our teacher ResNet model is trained on both real images and computer graphics generated images. The body part ground truth annotations are only present on computer graphics generated images. |
 |
| An example that shows the distillation of teacher ResNet model’s predictions into a student MobileNet based BodyPix model. |
Along with PoseNet, we think BodyPix will be another small step toward
motion capture in-the-wild, locally, on a consumer device. There are still quite a few research problems yet to be fully solved: for instance capturing 3D body shape, high frequency soft tissue muscle motion, and detailed clothing appearance and its deformation. Although looking forward, we optimistically envision motion capture technology to be more accessible and useful in a broad range of applications and industries.
We’ve provided just a few examples and utility methods to help you get started with the BodyPix model and hope that it inspires you to tinker with the model. What will you create? We’d love to hear about it, so don’t forget to share your projects using #tensorflowjs, #bodypix, and #PoweredByTF.


