https://blog.tensorflow.org/2020/05/pose-animator-open-source-tool-to-bring-svg-characters-to-life.html?hl=ur
https://blogger.googleusercontent.com/img/b/R29vZ2xl/AVvXsEjtZ6VXz_hF6aLYS-494KnbiPg-rStHJujKJ4V7uzxZ7AsuMCFwilkLlA3jMM7ZPHYY3lbqtX8Dwm_5Jr3cuf4y6nQogc0_vvsTpwsjFayukU5yjJg6TrmibQLZqjBlCuD4gY7Rcu908gs/s1600/movementgif.gif
Pose Animator - An open source tool to bring SVG characters to life in the browser via motion capture
By Shan Huang, Creative Technologist, Google Partner Innovation
Background
The
PoseNet and
Facemesh (from
Mediapipe) TensorFlow.js models made real time human perception in the browser possible through a simple webcam. As an animation enthusiast who struggles to master the complex art of character animation, I saw hope and was really excited to experiment using these models for interactive, body-controlled animation.
The result is
Pose Animator, an
open-source web animation tool that brings SVG characters to life with body detection results from webcam. This blog post covers the technical design of Pose Animator, as well as the steps for designers to create and animate their own characters.
Using FaceMesh and PoseNet with TensorFlow.js to animate full body character
The overall idea of Pose Animator is to take a 2D vector illustration and update its containing curves in real-time based on the recognition result from PoseNet and FaceMesh. To achieve this, Pose Animator borrows the idea of skeleton-based animation from computer graphics and applies it to vector characters.
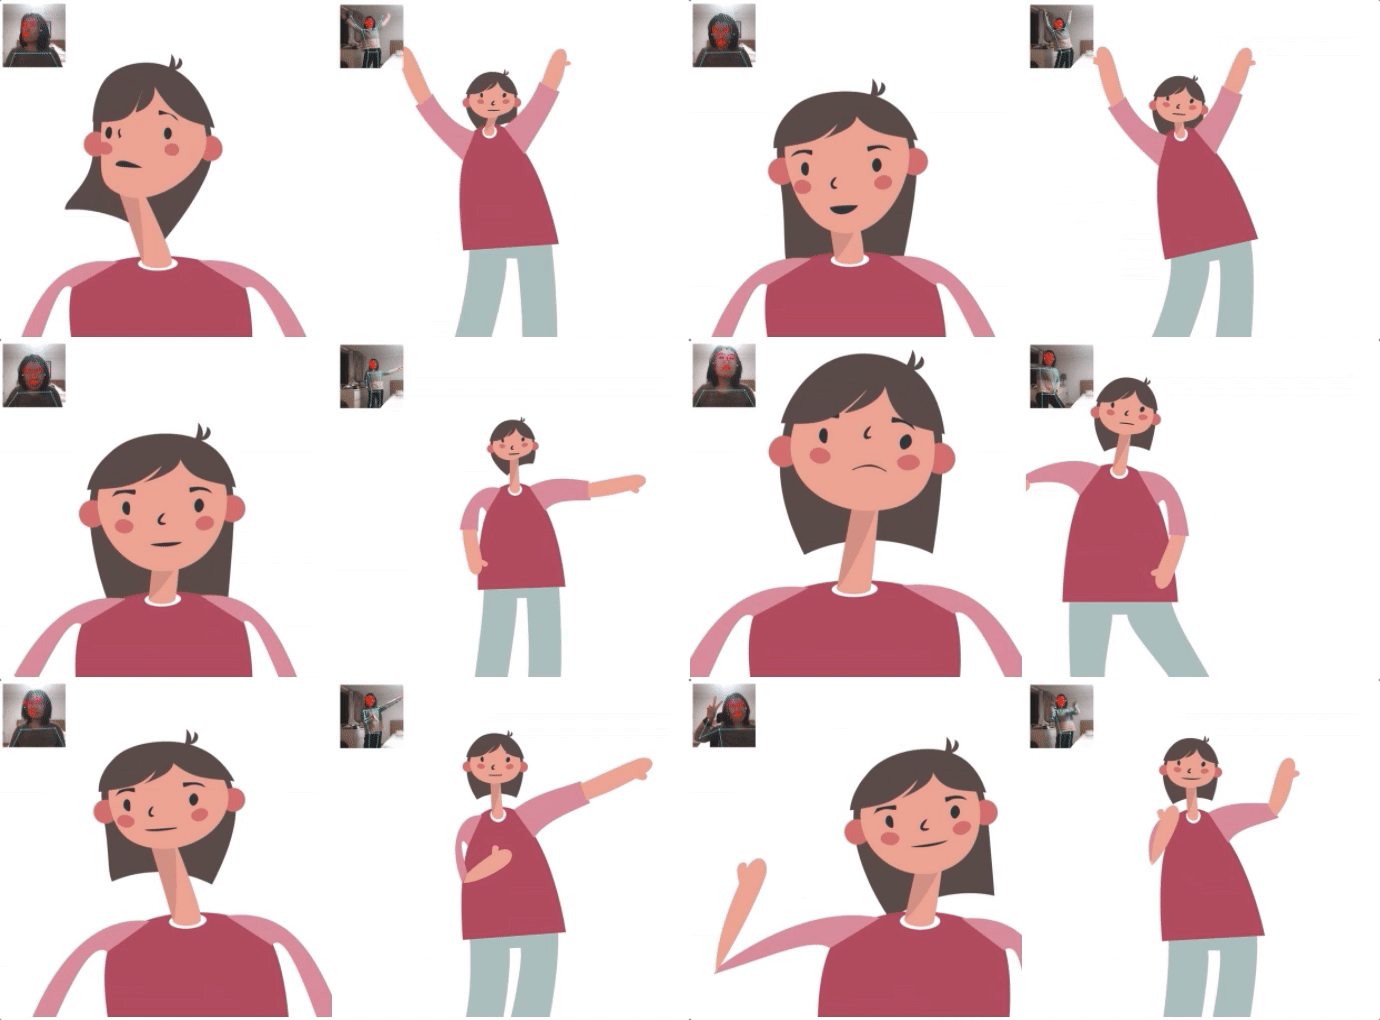
In skeletal animation a character is represented in two parts:
- a surface used to draw the character, and
- a hierarchical set of interconnected bones used to animate the surface.
In Pose Animator, the surface is defined by the 2D vector paths in the input SVG files. For the bone structure, Pose Animator provides a predefined rig (bone hierarchy) representation, based on the key points from PoseNet and FaceMesh. This bone structure’s initial pose is specified in the input SVG file, along with the character illustration, while the real time bone positions are updated by the recognition result from ML models.
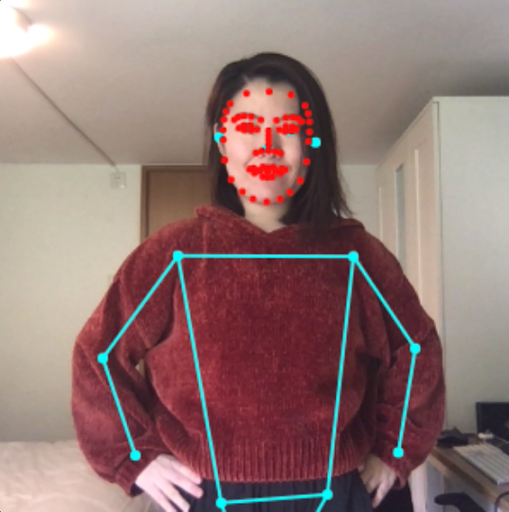 |
| Detection keypoints from PoseNet (blue) and FaceMesh (red) |
Check out
these steps to create your own SVG character for Pose Animator.
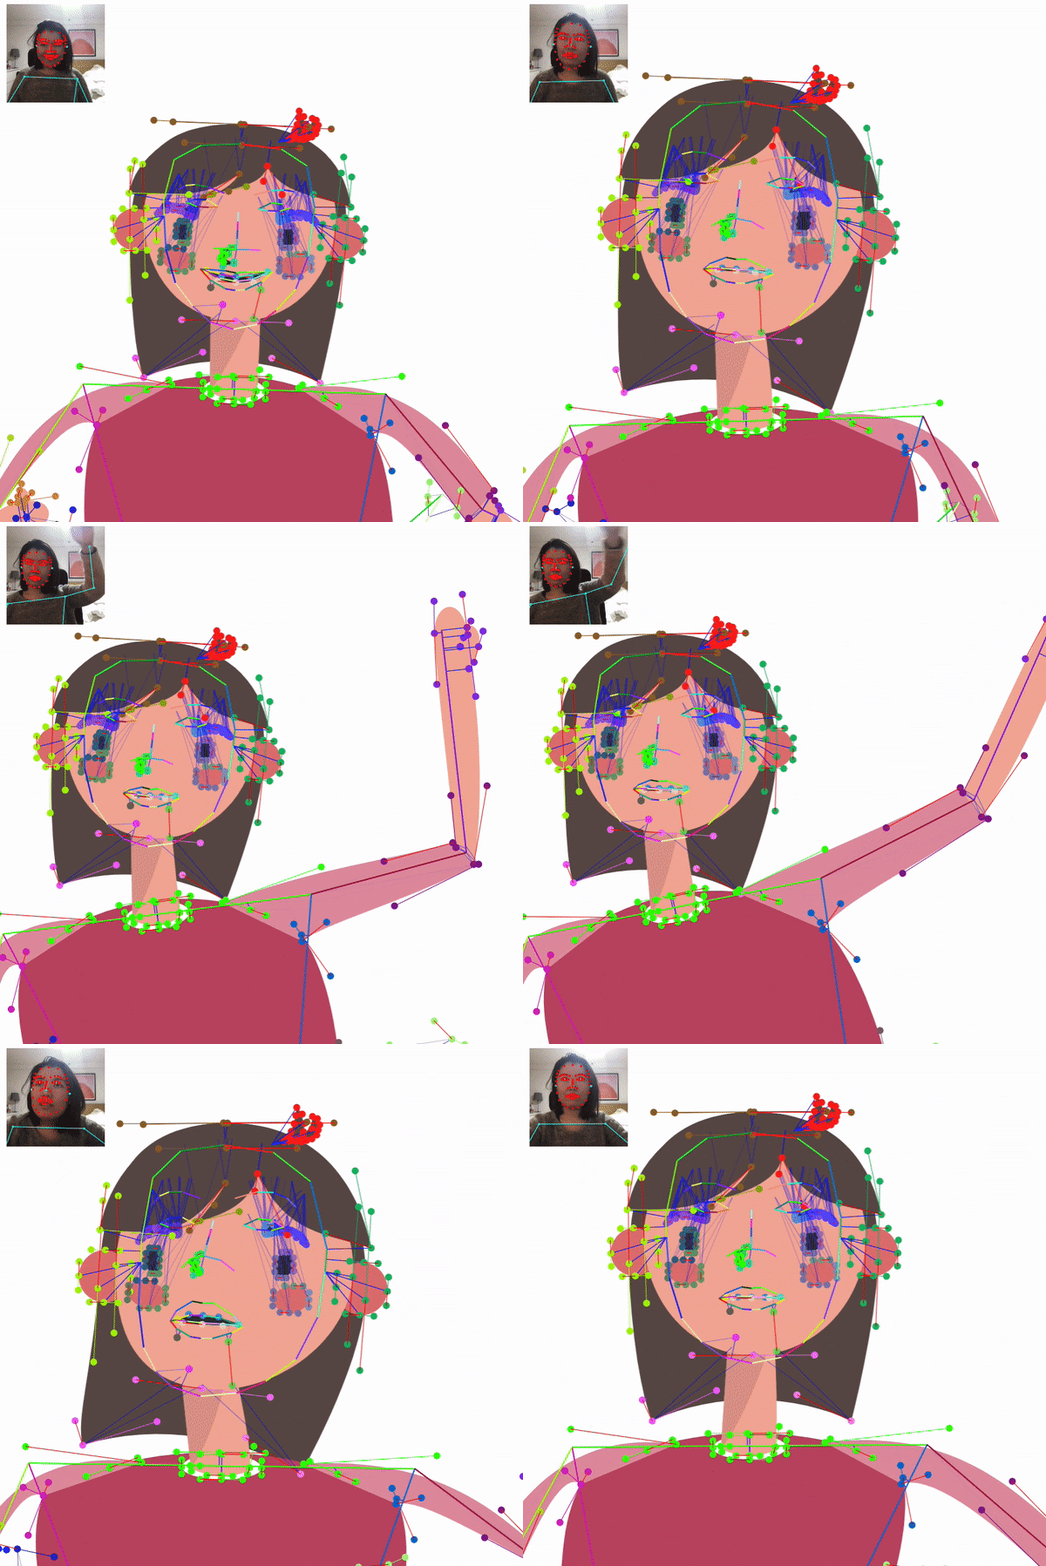 |
| Animated bezier curves controlled by PoseNet and FaceMesh output/td> |
Rigging Flow Overview
The full rigging (skeleton binding) flow requires the following steps:
- Parse the input SVG file for the vector illustration and the predefined skeleton, both of which are in T-pose (initial pose).
- Iterate through every segment in vector paths to compute the weight influence and transformation from each bone using Linear Blend Skinning (explained later in this post).
- In real time, run FaceMesh and PoseNet on each input frame and use result keypoints to update the bone positions.
- Compute new positions of vector segments from the updated bone positions, bone weights and transformations.
There are other tools that provide similar puppeteering functionality, however, most of them only update asset bounding boxes and do not deform the actual geometry of characters with recognition key points. Also, few tools provide full body recognition and animation. By deforming individual curves, Pose Animator is good at capturing the nuances of facial and full body movement and hopefully provides more expressive animation.
Rig Definition
The rig structure is designed according to the output key points from PoseNet and FaceMesh. PoseNet returns 17 key points for the full body, which is simple enough to directly include in the rig. FaceMesh however provides 486 keypoints, so I needed to be more selective about which ones to include. In the end I selected 73 key points from the FaceMesh output and together we have a full body rig of 90 keypoints and 78 bones as shown below:
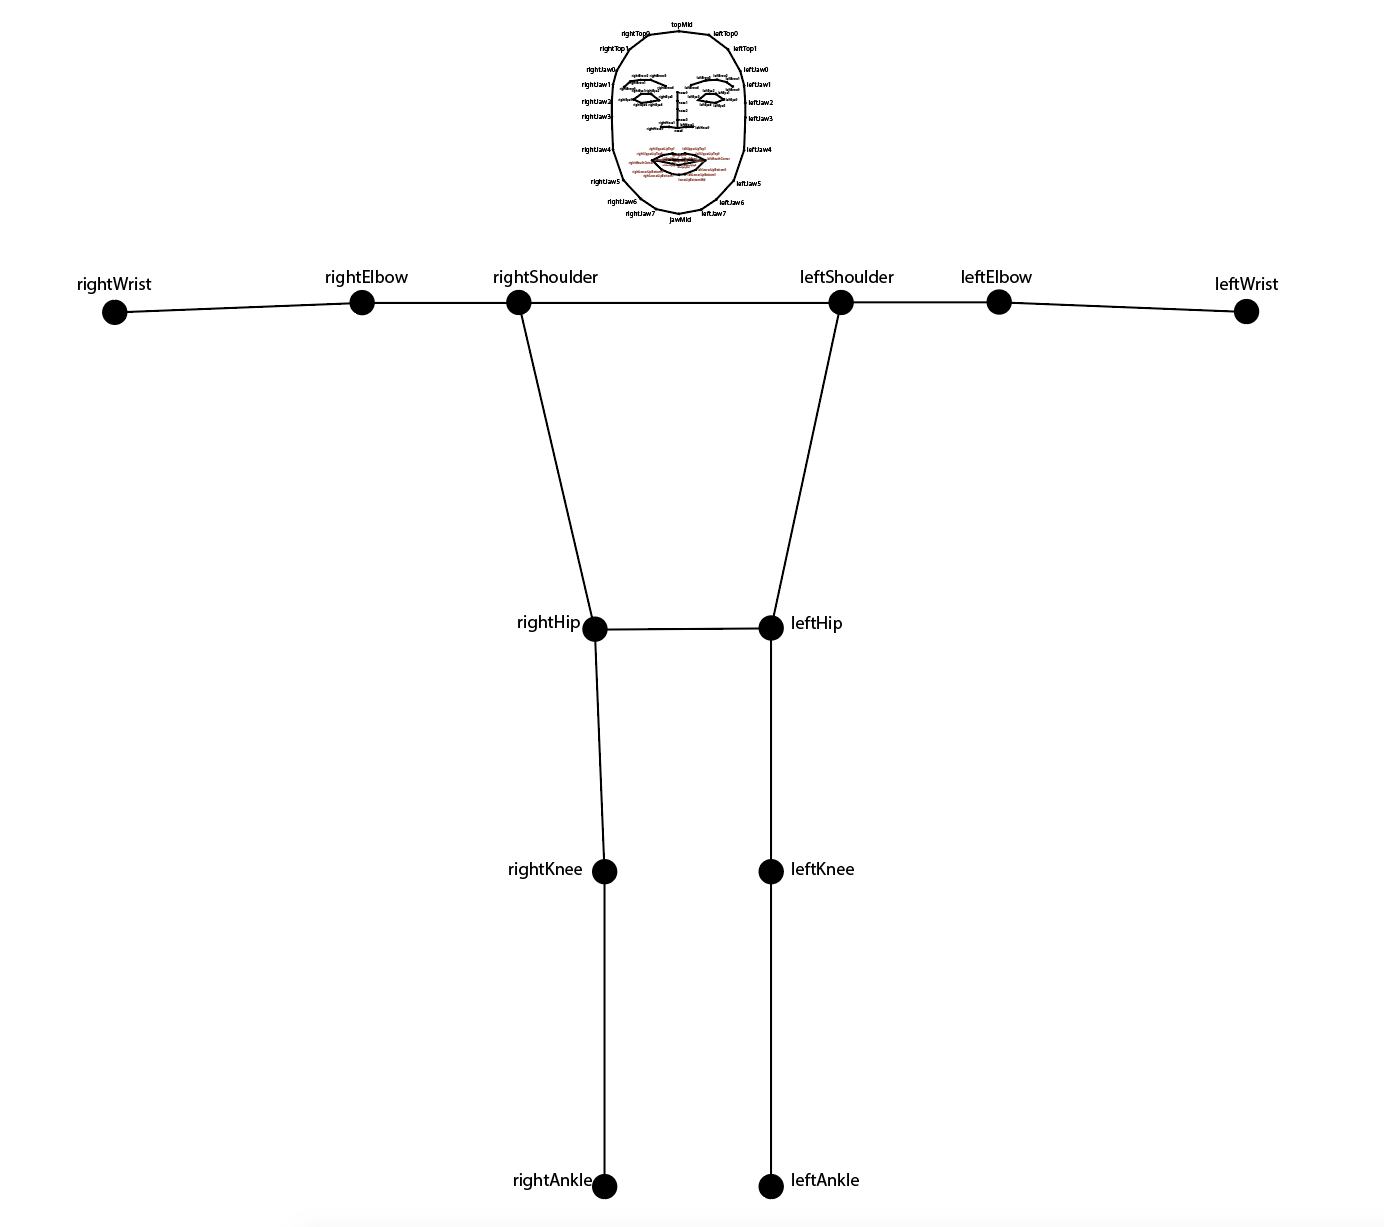 |
| The 90 keypoints, 78 bones full body rig |
Every input SVG file is expected to contain this skeleton in default position. More specifically, Pose Animator will look for a group called ‘skeleton’ containing anchor elements named with the respective joint they represent. A sample rig SVG can be found
here.
Designers have the freedom to move the joints around in their design files to best embed the rig into the character. Pose Animator will compute skinning according to the default position in the SVG file, although extreme cases (e.g. very short leg / arm bones) may not be well supported by the rigging algorithm and may produce unnatural results.
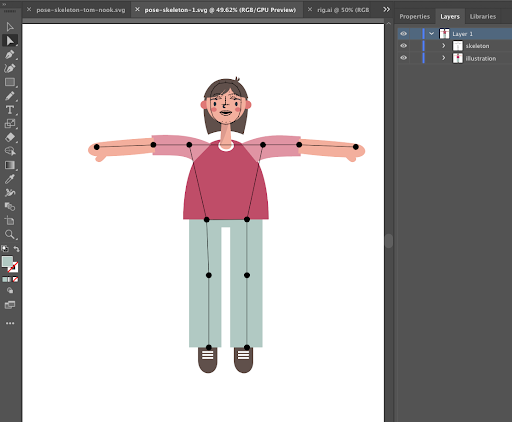 |
| The illustration with embedded rig in design software (Adobe Illustrator) |
Linear Blend Skinning for vector paths
Pose Animator uses one of the most common rigging algorithms for deforming surfaces using skeletal structures - Linear Blend Skinning (LBS), which transforms a vertex on a surface by blending together its transformation controlled by each bone alone, weighted by each bone’s influence. In our case, a vertex refers to an anchor point on a vector path, and bones are defined by two connected keypoints in the above rig (e.g. the ‘leftWrist’ and ‘leftElbow’ keypoints define the bone ‘leftWrist-leftElbow’).
To put into math formula, the world space position of the vertex vi’ is computed as

where
- w
i is the influence of bone i on vertex i,
- v
i describes vertex i’s initial position,
- T
j describes the spatial transformation that aligns the initial pose of bone j with its current pose.
The influence of bones can be automatically generated or manually assigned through weight painting. Pose Animator currently only supports auto weight assignment. The raw influence of bone j on vertex i is calculated as:

Where d is the distance from vi to the nearest point on bone j. Finally we normalize the weight of all bones for a vertex to sum up to 1.

Now, to apply LBS on 2D vector paths, which are composed of straight lines and
bezier curves, we need some special treatment for bezier curve segments with in and out handles. We need to compute weights separately for curve points, in control point, and out control point. This produces better looking results because the bone influence for control points are more accurately captured.
There is one exception case. When the in control point, curve point, and out control point are collinear, we use the curve point weight for all three points to guarantee that they stay collinear when animated. This helps to preserve the smoothness of curves.
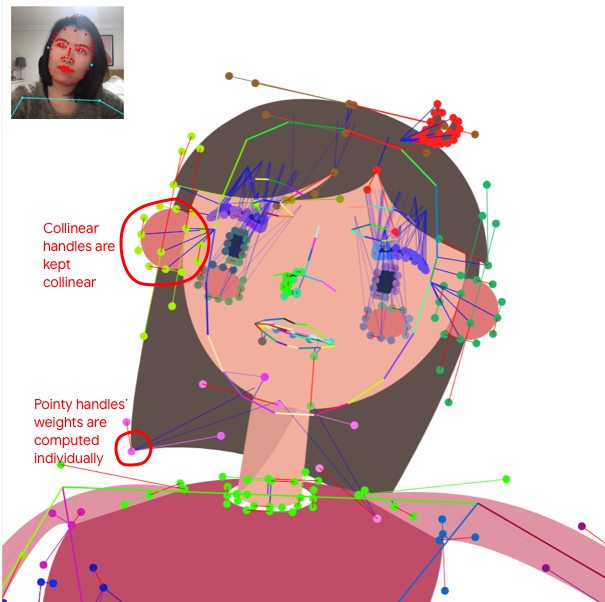 |
| Collinear curve handles share the same weight to stay collinear |
Motion stabilization
While LBS already gives us animated frames, there’s a noticeable amount of jittering introduced by FaceMesh and PoseNet raw output. To reduce the jitter and get smoother animation, we can use the confidence scores from prediction results to weigh each input frame unevenly, granting less influence to low-confidence frames.
Following this idea, Pose Animator computes the smoothed position of joint i at frame t as

where

The smoothed confidence score of frame i is computed as

Consider extreme cases. When two consecutive frames both have confidence score 1, position approaches the latest position at 50% speed, which looks responsive and reasonably smooth. (To further play with responsiveness, you can tweak the approach speed by changing the weight on the latest frame.)
When the latest frame has confidence score 0, its influence is completely ignored, preventing low confidence results from introducing sudden jerkiness.
Confidence score based clipping
In addition to interpolating joint positions with confidence scores, we also introduce a minimum threshold to decide if a path should be rendered at all.
The confidence score of a path is the averaged confidence score of its segment points, which in turn is the weighted average of the influence bones’ scores. The whole path is hidden for a particular frame when its score is below a certain threshold.
This is useful for hiding paths in low confidence areas, which are often body parts out of the camera view. Imagine an upper body shot: PoseNet will always return keypoint predictions for legs and hips though they will have low confidence scores. With this clamping mechanism we can make sure lower body parts are properly hidden instead of showing up as strangely distorted paths.
Looking ahead
To mesh or not to mesh
The current rigging algorithm is heavily centered around 2D curves. This is because the 2D rig constructed from PoseNet and FaceMesh has a large range of motion and varying bone lengths - unlike animation in games where bones have relatively fixed length. I currently get smoother results from deforming bezier curves than deforming the triangulated mesh from input paths, because bezier curves preserve the curvature / straightness of input lines better.
I am keen to improve the rigging algorithm for meshes. Besides, I want to explore a more advanced rigging algorithm than Linear Blend Skinning, which has limitations such as volume thinning around the bent areas.
New editing features
Pose Animator delegates illustration editing to design softwares like Illustrator, which are powerful for editing vector graphics, but not tailored for animation / skinning requirements. I want to support more animation features through in-browser UI, including:
- Skinning weight painting tool, to enable tweaking individual weights on keypoints manually. This will provide more precision than auto weight assignment.
- Support raster images in the input SVG files, so artists may use photos / drawings in their design. Image bounding boxes can be easily represented as vector paths so it’s straightforward to compute its deformation using the current rigging algorithm.
Try it yourself!
Try out the
live demos, where you can either play with existing characters, or add in your own SVG character and see them come to life.
I’m the most excited to see what kind of interactive animation the creative community will create. While the demos are human characters, Pose Animator will work for any 2D vector design, so you can go as abstract / avant-garde as you want to push its limits.
To create your own animatable illustration, please
check out this guide! Don’t forget to share your creations with us using
#PoseAnimator on social media. Feel free to reach out to me on twitter
@yemount for any questions.
Alternatively if you want to view the source code directly, it is available to
fork on github here. Happy hacking!


 The smoothed confidence score of frame i is computed as


