https://blog.tensorflow.org/2020/09/how-to-create-cartoonizer-with-tf-lite.html?hl=ur
https://blogger.googleusercontent.com/img/b/R29vZ2xl/AVvXsEj3MsQdKyzlChU9Er2kpGjahTCXa4o9Epg3zrnnjq4SCpl2hkx4MEoOWYVxE7Gj5q4bTgy2uShmWp-YA1a5om8Ha32mq9AEgU28ttwxMj8QUUiuqeLRaRAdHg_a53ApMIBTt5_UxqFd0Oc/s1600/cartoonizer.png
A guest post by ML GDEs
Margaret Maynard-Reid (Tiny Peppers) and
Sayak Paul (PyImageSearch)
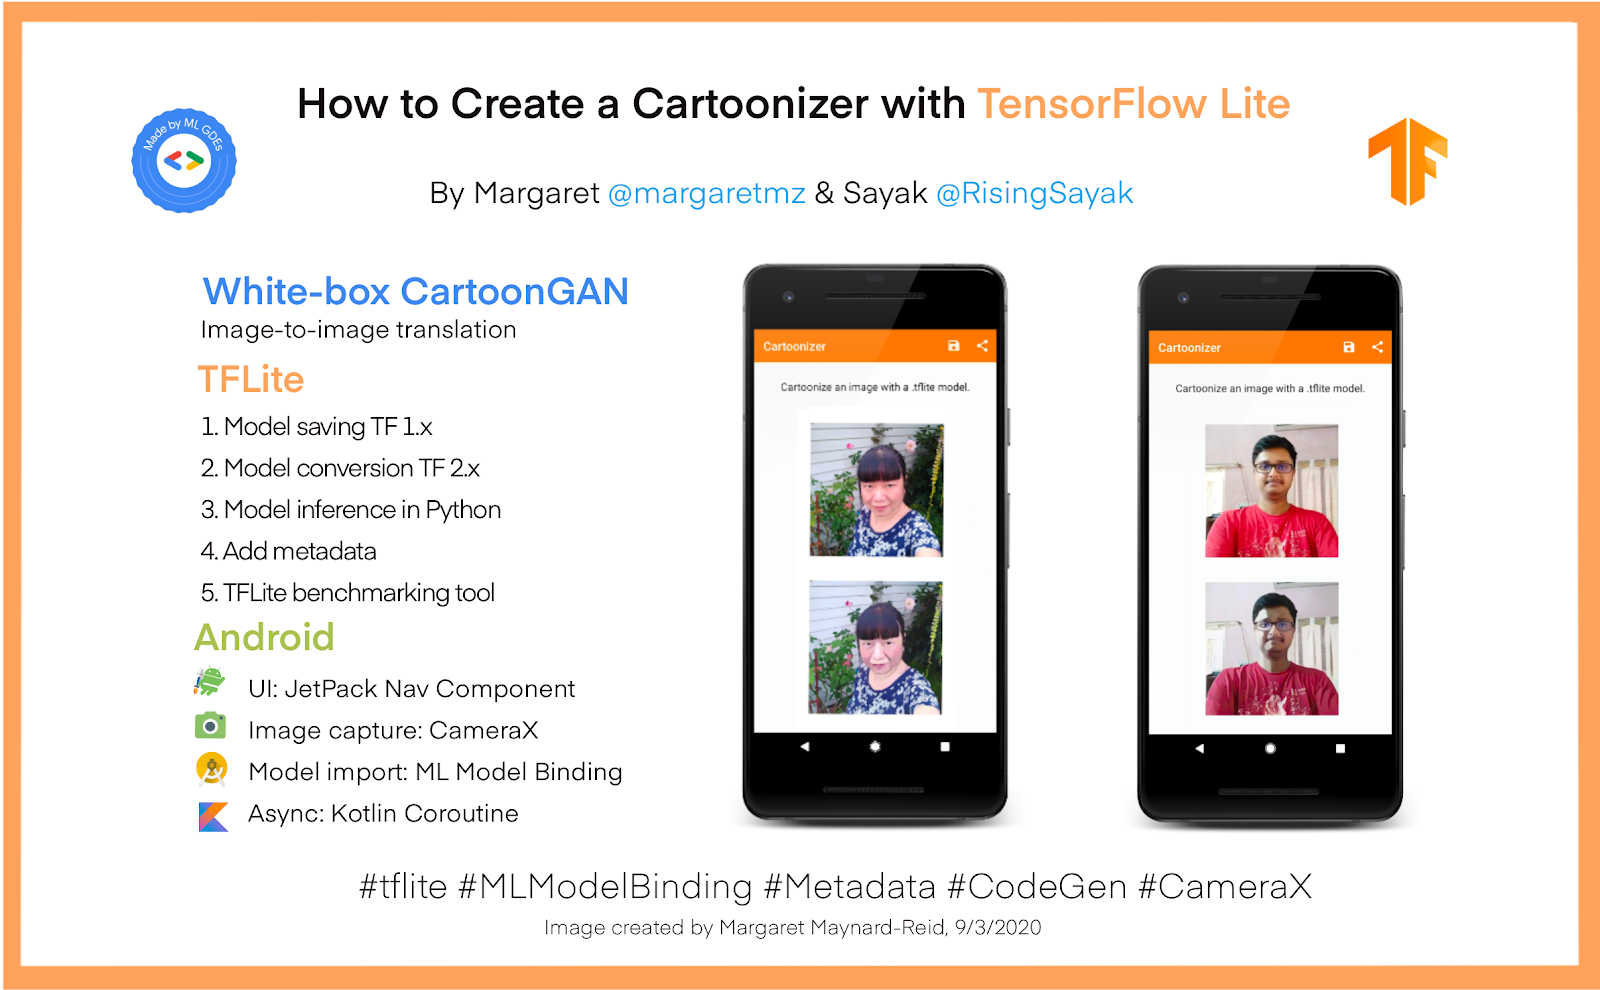
This is an end-to-end tutorial on how to convert a TensorFlow model to TensorFlow Lite (TFLite) and deploy it to an Android app for cartoonizing an image captured by the camera.

We created this end-to-end tutorial to help developers with these objectives:
- Provide a reference for the developers looking to convert models written in TensorFlow 1.x to their TFLite variants using the new features of the latest (v2) converter — for example, the MLIR-based converter, more supported ops, and improved kernels, etc.
(In order to convert TensorFlow 2.x models in TFLite please follow this guide.)
- How to download the .tflite models directly from TensorFlow Hub if you are only interested in using the models for deployment.
- Understand how to use the TFLite tools such as the Android Benchmark Tool, Model Metadata, and Codegen.
- Guide developers on how to create a mobile application with TFLite models easily, with ML Model Binding feature from Android Studio.
Please follow along with the notebooks
here for model saving/conversion, populating metadata; and the Android code on GitHub
here. If you are not familiar with the SavedModel format, please refer to the
TensorFlow documentation for details. While this tutorial discusses the steps of how to create the TFLite models , feel free to download them directly from TensorFlow Hub
here and get started using them in your own applications.
White-box CartoonGAN is a type of generative adversarial network that is capable of transforming an input image (preferably a natural image) to its cartoonized representation. The goal here is to produce a cartoonized image from an input image that is visually and semantically aesthetic. For more details about the model check out the paper
Learning to Cartoonize Using White-box Cartoon Representations by Xinrui Wang and Jinze Yu. For this tutorial, we used the generator part of White-box CartoonGAN.
Create the TensorFlow Lite Model
The authors of White-box CartoonGAN
provide pre-trained weights that can be used for making inference on images. However, those weights are not ideal if we were to develop a mobile application without having to make API calls to fetch them. This is why we will first convert these pre-trained weights to TFLite which would be much more suitable to go inside a mobile application. All of the code discussed in this section is available on GitHub
here.
Here is a step-by-step summary of what we will be covering in this section:
- Generate a SavedModel out of the pre-trained model checkpoints.
- Convert SavedModel with post-training quantization using the latest TFLiteConverter.
- Run inference in Python with the converted model.
- Add metadata to enable easy integration with a mobile app.
- Run model benchmark to make sure the model runs well on mobile.
Generate a SavedModel from the pre-trained model weights
The pre-trained weights of White-box CartoonGAN come in the following format (also referred to as checkpoints) -
├── checkpoint
├── model-33999.data-00000-of-00001
└── model-33999.index
As the original White-box CartoonGAN model is implemented in TensorFlow 1, we first need to generate a single self-contained model file in the SavedModel format using TensorFlow 1.15. Then we will switch to TensorFlow 2 later to convert it to the lightweight TFLite format. To do this we can follow this workflow -
- Create a placeholder for the model input.
- Instantiate the model instance and run the input placeholder through the model to get a placeholder for the model output.
- Load the pre-trained checkpoints into the current session of the model.
- Finally, export to SavedModel.
Note that the aforementioned workflow will be based on TensorFlow 1.x.
This is how all of this looks in code in TensorFlow 1.x:
with tf.Session() as sess:
   input_photo = tf.placeholder(tf.float32, [1, None, None, 3], name='input_photo')

   network_out = network.unet_generator(input_photo)
   final_out = guided_filter.guided_filter(input_photo, network_out,           r=1, eps=5e-3)
   final_out = tf.identity(final_out, name='final_output')

   all_vars = tf.trainable_variables()
   gene_vars = [var for var in all_vars if 'generator' in var.name]
   saver = tf.train.Saver(var_list=gene_vars)
   sess.run(tf.global_variables_initializer())
   saver.restore(sess, tf.train.latest_checkpoint(model_path))

   # Export to SavedModel
   tf.saved_model.simple_save(
  sess,
      saved_model_directory,
      inputs={input_photo.name: input_photo},
      outputs={final_out.name: final_out}
   )
Now that we have the original model in the SavedModel format, we can switch to TensorFlow 2 and proceed toward converting it to TFLite.
Convert SavedModel to TFLite
TFLite provides support for three different
post-training quantization strategies -
- Dynamic range
- Float16
- Integer
Based on one’s use-case a particular strategy is determined. In this tutorial, however, we will be covering all of these different quantization strategies to give you a fair idea.
TFLite models with dynamic-range and float16 quantization
The steps to convert models to TFLite using these two quantization strategies are almost identical except during float16 quantization, you need to specify an extra option. The steps for model conversion are demonstrated in the code below -
# Create a concrete function from the SavedModel
model = tf.saved_model.load(saved_model_dir)
concrete_func = model.signatures[
    tf.saved_model.DEFAULT_SERVING_SIGNATURE_DEF_KEY]

# Specify the input shape
concrete_func.inputs[0].set_shape([1, IMG_SHAPE, IMG_SHAPE, 3])

# Convert the model and export
converter = tf.lite.TFLiteConverter.from_concrete_functions([concrete_func])
converter.optimizations = [tf.lite.Optimize.DEFAULT]
converter.target_spec.supported_types = [tf.float16] # Only for float16
tflite_model = converter.convert()
open(tflite_model_path, 'wb').write(tflite_model)
A couple of things to note from the code above -
- Here, we are specifying the input shape of the model that will be converted to TFLite. However, note that TFLite supports dynamic shaped models from TensorFlow 2.3. We used fixed-shaped inputs in order to restrict the memory usage of the models running on mobile devices.
- In order to convert the model using dynamic-range quantization, one just needs to comment this line
converter.target_spec.supported_types = [tf.float16].
TFLite models with integer quantization
In order to convert the model using integer quantization, we need to pass a representative dataset to the converter so that the activation ranges can be calibrated accordingly. TFLite models generated using this strategy are known to sometimes work better than the other two that we just saw. Integer quantized models are generally smaller as well.
For the sake of brevity, we are going to skip the representative dataset generation part but you can refer to it in
this notebook.
In order to let the
TFLiteConverter take advantage of this strategy, we need to just pass
converter.representative_dataset = representative_dataset_gen and remove
converter.target_spec.supported_types = [tf.float16].
So after we generated these different models here’s how we stand in terms of model size -

You might feel tempted to just go with the model quantized with integer quantization but you should also consider the following things before finalizing this decision -
- Quality of the end results of the models.
- Inference time (the lower the better).
- Hardware accelerator compatibility.
- Memory usage.
We will get to these in a moment. If you want to dig deeper into these different quantization strategies refer to the official guide
here.
These models are available on TensorFlow Hub and you can find them here. Running inference in Python
After you have generated the TFLite models, it is important to make sure that models perform as expected. A good way to ensure that is to run inference with the models in Python before integrating them in mobile applications.
Before feeding an image to our White-box CartoonGAN TFLite models it’s important to make sure that the image is preprocessed well. Otherwise, the models might perform unexpectedly. The original model was trained using BGR images, so we need to account for this fact in the preprocessing steps as well. You can find all of the preprocessing steps in this
notebook.
Here is the code to use a TFLite model for making inference on a preprocessed input image -
interpreter = tf.lite.Interpreter(model_path=tflite_model_path)
input_details = interpreter.get_input_details()

interpreter.allocate_tensors()
interpreter.set_tensor(input_details[0]['index'],
preprocessed_source_image)
interpreter.invoke()

raw_prediction = interpreter.tensor(
    interpreter.get_output_details()[0]['index'])()
As mentioned above, the output would be an image but with BGR channel ordering which might not be visually appropriate. So, we would need to account for that fact in the postprocessing steps.
After the postprocessing steps are incorporated here is how the final image would look like alongside the original input image -

Again, you can find all of the postprocessing steps in
this notebook.
Add metadata for easy integration with a mobile app
Model metadata in TFLite makes the life of mobile application developers much easier. If your TFLite model is populated with the right metadata then it becomes a matter of only a few keystrokes to integrate that model into a mobile application. Discussing the code to populate a TFLite model with metadata is out of the scope for this tutorial, and please refer to the
metadata guide. But in this section, we are going to provide you with some of the important pointers about metadata population for the TFLite models we generated. You can follow
this notebook to refer to all the code. Two of the most important parameters we discovered during metadata population are mean and standard deviation with which the results should be processed. In our case, mean and standard deviation need to be used for both preprocessing postprocessing. For normalizing the input image the metadata configuration should be like the following -
input_image_normalization.options.mean = [127.5]
input_image_normalization.options.std = [127.5]
This would make the pixel range in an input image to [-1, 1]. Now, during postprocessing, the pixels need to be scaled back to the range of [0, 255]. For this, the configuration would go as follows -
output_image_normalization.options.mean = [-1]
output_image_normalization.options.std = [0.00784313] # 1/127.5
There are two files created from the “add metadata process”:
- A .tflite file with the same name as the original model, with metadata added, including model name, description, version, input and output tensor, etc.
- To help to display metadata, we also export the metadata into a .json file so that you can print it out. When you import the model into Android Studio, metadata can be displayed as well.
The models that have been populated with metadata make it really easy to import in Android Studio which we will discuss later under the “Model deployment to an Android” section.
Benchmark models on Android (Optional)
As an optional step, we used the TFLite Android Model Benchmark tool to get an idea of the runtime performance on Android before deploying it.
There are two options of using the benchmark tool, one with a
C++ binary running in background and another with an
Android APK running in foreground.
Here ia a high-level summary using the benchmark C++ binary:
1. Configure Android SDK/NDK prerequisites
2. Build the benchmark C++ binary with bazel
bazel build -c opt \
      --config=android_arm64 \
      tensorflow/lite/tools/benchmark:benchmark_model
3. Use adb (Android Debug Bridge) to push the benchmarking tool binary to device and make executable
adb push benchmark_model /data/local tmp
    adb shell chmod +x /data/local/tmp/benchmark_model
4. Push the whitebox_cartoon_gan_dr.tflite model to device
adb push whitebox_cartoon_gan_dr.tflite /data/local/tmp
5. Run the benchmark tool
adb shell /data/local/tmp/android_aarch64_benchmark_model \
      --graph=/data/local/tmp/whitebox_cartoon_gan_dr.tflite \
      --num_threads=4
You will see a result in the terminal like this:

Repeat above steps for the other two tflite models:
float16 and
int8 variants.
In summary, here is the average inference time we got from the benchmark tool running on a Pixel 4:

Refer to the documentation of the benchmark tool (
C++ binary |
Android APK) for details and additional options such as how to reduce variance between runs and how to profile operators, etc. You can also see the performance values of some of the popular ML models on the TensorFlow official documentation
here.
Model deployment to Android
Now that we have the quantized TensorFlow Lite models with metadata by either following the previous steps (or by downloading the models directly from TensorFlow Hub
here), we are ready to deploy them to Android. Follow along with the Android code on GitHub
here.
The Android app uses Jetpack Navigation Component for UI navigation and CameraX for image capture. We use the new ML Model Binding feature for importing the tflite model and then Kotlin Coroutine for async handling of the model inference so that the UI is not blocked while waiting for the results.
Let’s dive into the details step by step:
- Download Android Studio 4.1 Preview.
- Create a new Android project and set up the UI navigation.
- Set up the CameraX API for image capture.
- Import the .tflite models with ML Model Binding.
- Putting everything together.
Download Android Studio 4.1 Preview
We need to first install Android Studio Preview (4.1 Beta 1) in order to use the new ML Model Binding feature to import a .tflite model and auto code generation. You can then explore the tfllite models visually and most importantly use the generated classes directly in your Android projects.
Download the Android Studio Preview
here. You should be able to run the Preview version side by side with a stable version of Android Studio. Make sure to update your Gradle plug-in to at least 4.1.0-alpha10; otherwise the ML Model Binding menu may be inaccessible.
Create a new Android Project
First let’s create a new Android project with an empty
Activity called
MainActivity.kt which contains a companion object that defines the output directory where the captured image will be stored.
Use Jetpack Navigation Component to navigate the UI of the app. Please refer to the tutorial
here to learn more details about this support library.
There are 3 screens in this sample app:
PermissionsFragment.kt handles checking the camera permission.
CameraFragment.kt handles camera setup, image capture and saving.
CartoonFragment.kt handles the display of input and cartoon image in the UI.
The navigation graph in
nav_graph.xml defines the navigation of the three screens and data passing between
CameraFragment and
CartoonFragment.
Set up CameraX for image capture
CameraX is a Jetpack support library which makes camera app development much easier.
Camera1 API was simple to use but it lacked a lot of functionality. Camera2 API provides more fine control than Camera1 but it’s very complex — with almost 1000 lines of code in a very basic example.
CameraX on the other hand, is much easier to set up with 10 times less code. In addition, it’s lifecycle aware so you don’t need to write the extra code to handle the Android lifecycle.
Here are the steps to set up CameraX for this sample app:
- Update
build.gradle dependencies
- Use
CameraFragment.kt to hold the CameraX code
- Request camera permission
- Update
AndroidManifest.ml
- Check permission in
MainActivity.kt
- Implement a viewfinder with the CameraX Preview class
- Implement image capture
- Capture an image and convert it to a
Bitmap
CameraSelector is configured to be able to take use of the front facing and rear facing camera since the model can stylize any type of faces or objects, and not just a selfie.
Once we capture an image, we convert it to a
Bitmap which is passed to the TFLite model for inference. Navigate to a new screen
CartoonFragment.kt where both the original image and the cartoonized image are displayed.
Import the TensorFlow Lite models
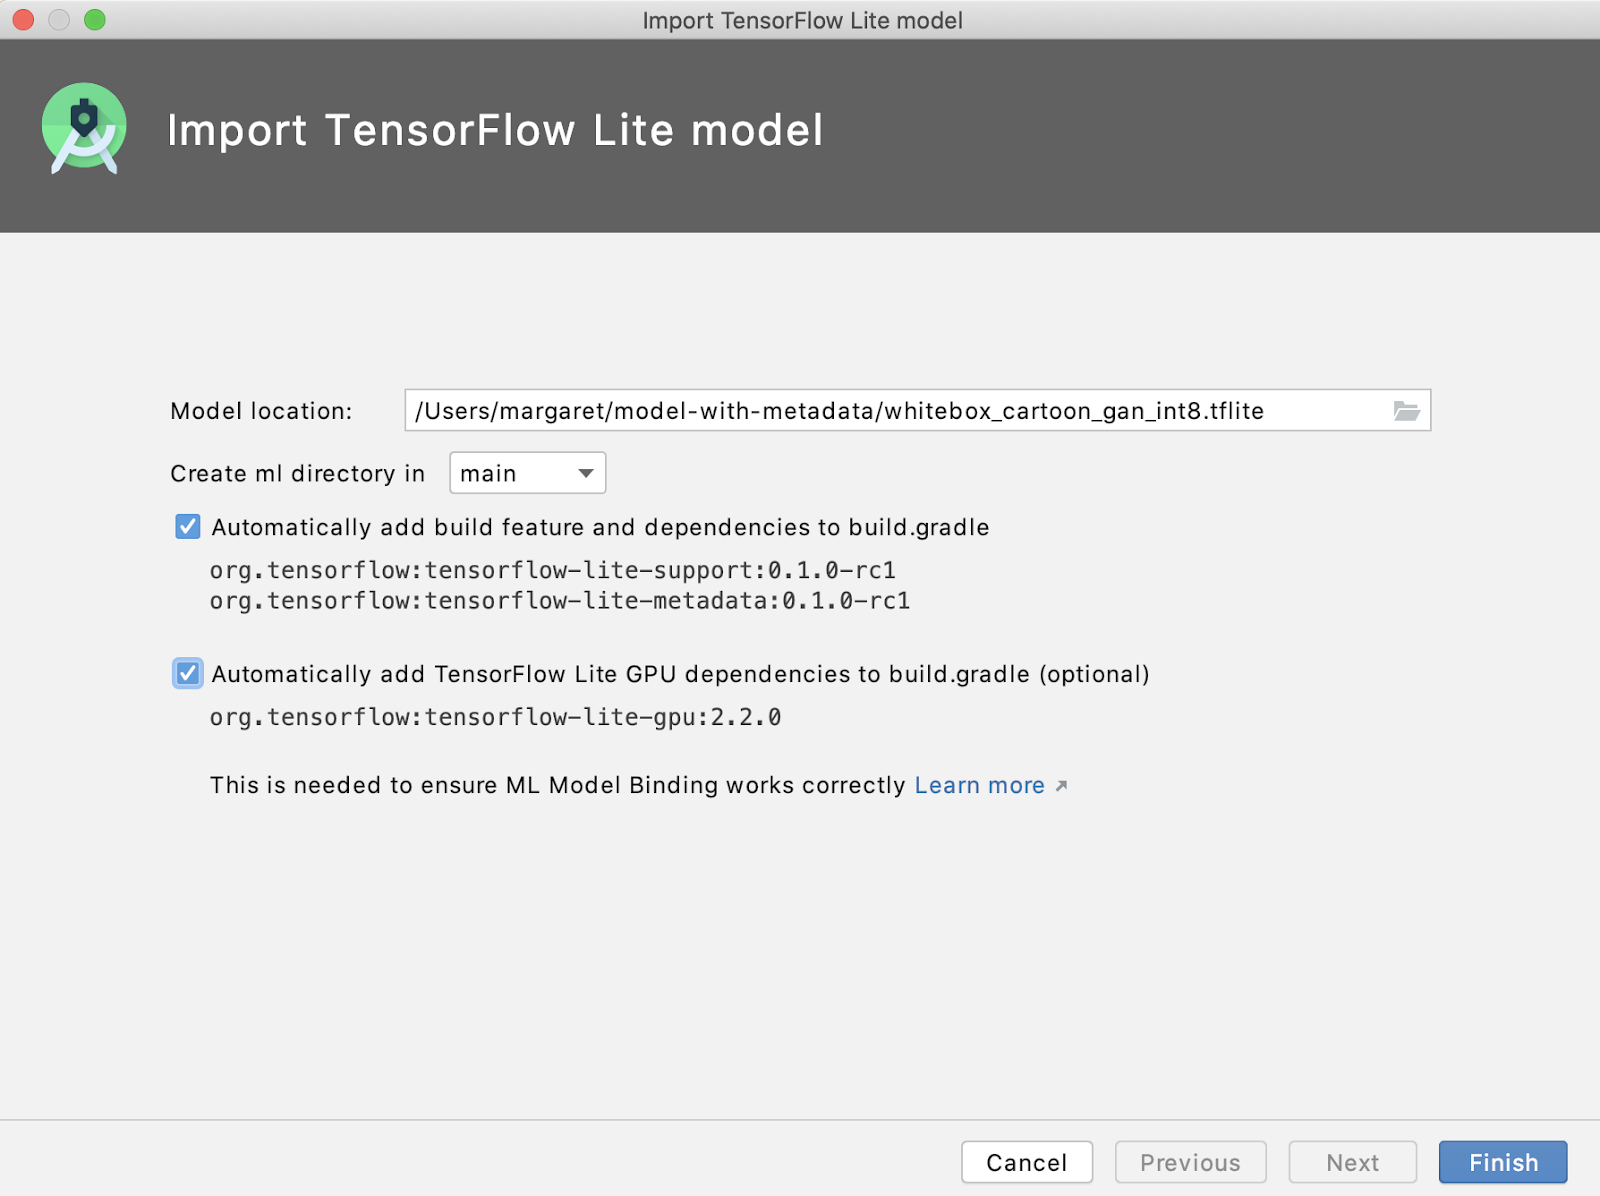
Now that the UI code has been completed. It’s time to import the TensorFlow Lite model for inference. ML Model Binding takes care of this with ease. In Android Studio, go to File > New > Other > TensorFlow Lite Model:

- Specify the .tflite file location.
- “Auto add build feature and required dependencies to gradle” is checked by default.
- Make sure to also check “Auto add TensorFlow Lite gpu dependencies to gradle” since the GAN models are complex and slow, and so we need to enable GPU delegate.

This import accomplishes two things:
- automatically create a ml folder and place the model file .tflite file under there.
- auto generate a Java class under the folder:
app/build/generated/ml_source_out/debug/[package-name]/ml, which handles all the tasks such as model loading, image pre-preprocess and post-processing, and run model inference for stylizing the input image.
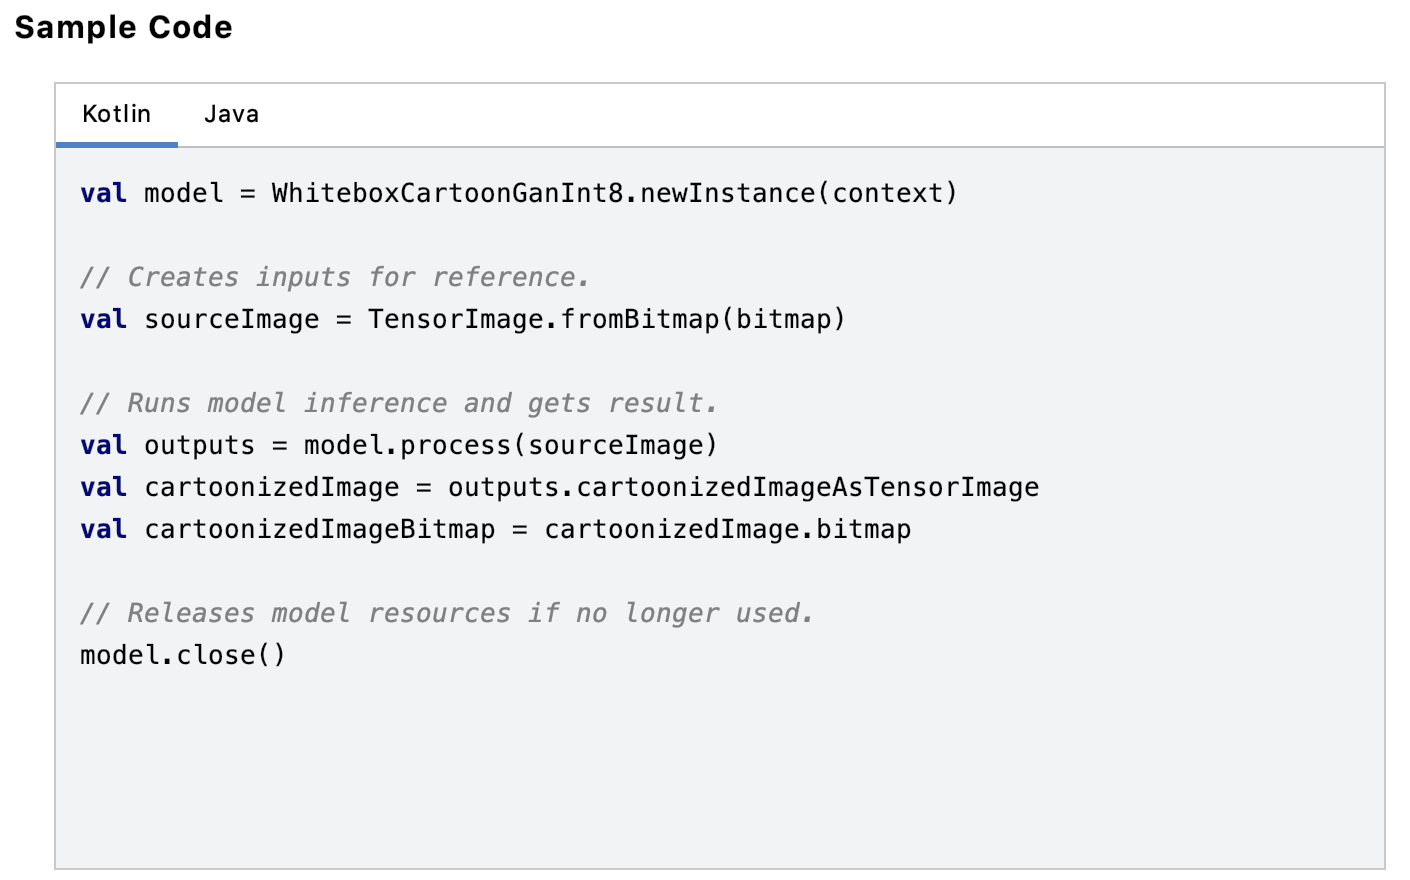
Once the import completes, we see the *.tflite display the model metadata info as well as code snippets in both Kotlin and Java that can be copy/pasted in order to use the model:

Repeat the steps above to import the other two .tflite model variants.
Putting everything together
Now that we have set up the UI navigation, configured CameraX for image capture, and the tflite models are imported, let’s put all the pieces together!
- Model input: capture a photo with CameraX and save it
- Run inference on the input image and create a cartoonized version
- Display both the original photo and the cartoonized photo in the UI
- Use Kotlin coroutine to prevent the model inference from blocking UI main thread
First we capture a photo with CameraX in CameraFragment.kt under
imageCaptue?.takePicture(), then in
ImageCapture.OnImageSavedCallback{},
onImageSaved() convert the .jpg image to a Bitmap, rotate if necessary, and then save it to an output directory defined in MainActivity earlier.
With the JetPack Nav Component, we can easily navigate to
CartoonFragment.kt and pass the image directory location as a string argument, and the type of tflite model as an integer. Then in
CartoonFragment.kt, retrieve the file directory string where the photo was stored, create an image file then convert it to be
Bitmap which can be used as the input to the tflite model.
In
CartoonFragment.kt, also retrieve the type of tflite model that was chosen for inference. Run model inference on the input image and create a cartoon image. We display both the original image and the cartoonized image in the UI.
Note: the inference takes time so we use Kotlin coroutine to prevent the model inference from blocking the UI main thread. Show a
ProgressBar till the model inference completes.
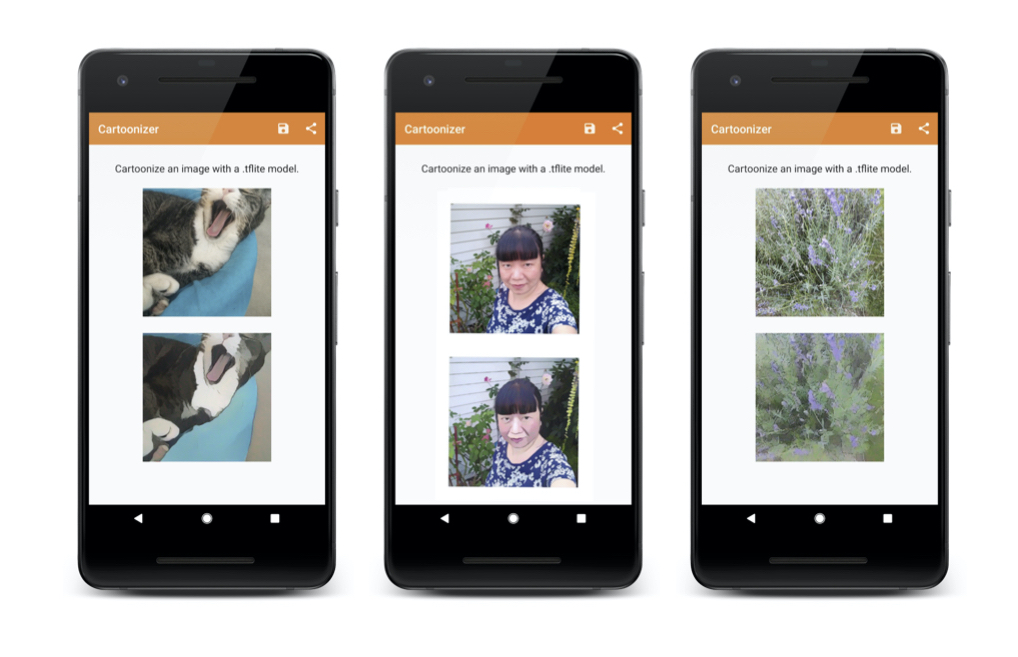
Here is what we have once all pieces are put together and here are the cartoon images created by the model:

This brings us to the end of the tutorial. We hope you have enjoyed reading it and will apply what you learned to your real-world applications with TensorFlow Lite. If you have created any cool samples with what you learned here, please remember to add it to
awesome-tflite - a repo with TensorFlow Lite samples, tutorials, tools and learning resources.
Acknowledgments
This
Cartoonizer with TensorFlow Lite project with end-to-end tutorial was created with the great collaboration by ML GDEs and the TensorFlow Lite team. This is the one of a series of
end-to-end TensorFlow Lite tutorials. We would like to thank Khanh LeViet and Lu Wang (TensorFlow Lite), Hoi Lam (Android ML), Trevor McGuire (CameraX) and Soonson Kwon (ML GDEs Google Developers Experts Program), for their collaboration and continuous support.
Also thanks to the authors of the paper
Learning to Cartoonize Using White-box Cartoon Representations: Xinrui Wang and Jinze Yu.
When developing applications, it’s important to consider recommended practices for responsible innovation; check out Responsible AI with TensorFlow for resources and tools you can use.


 Again, you can find all of the postprocessing steps in this notebook.
  Repeat above steps for the other two tflite models:

 This import accomplishes two things:
  Repeat the steps above to import the other two .tflite model variants.
  This brings us to the end of the tutorial. We hope you have enjoyed reading it and will apply what you learned to your real-world applications with TensorFlow Lite. If you have created any cool samples with what you learned here, please remember to add it to awesome-tflite - a repo with TensorFlow Lite samples, tutorials, tools and learning resources.