
Posted by Jen Person, Developer Advocate
I've often wondered why anonymity drives people to say things that they'd never dare say in person, and it’s unfortunate that comment sections for videos and articles are so often toxic! If you’re interested in content moderation, you can use machine learning to help detect toxic posts which you consider for removal.
Machine learning is a powerful tool for all sorts of natural language-processing tasks, including translation, sentiment analysis, and predictive text. But perhaps it feels outside the scope of your work. After all, when you're building a website in JavaScript, you don't have time to collect and validate data, train a model using Python, and then implement some backend in Python on which to run said model. Not that there's anything wrong with Python–it's just that, if you're a web developer, it's probably not your language of choice.
Fortunately, TensorFlow.js allows you to run your machine learning model on your website in everybody's favorite language: JavaScript. Furthermore, TensorFlow.js offers several pre-trained models for common use cases on the web. You can add the power of ML to your website in just a few lines of code! There is even a pre-trained model to help you moderate written content, which is what we're looking at today.
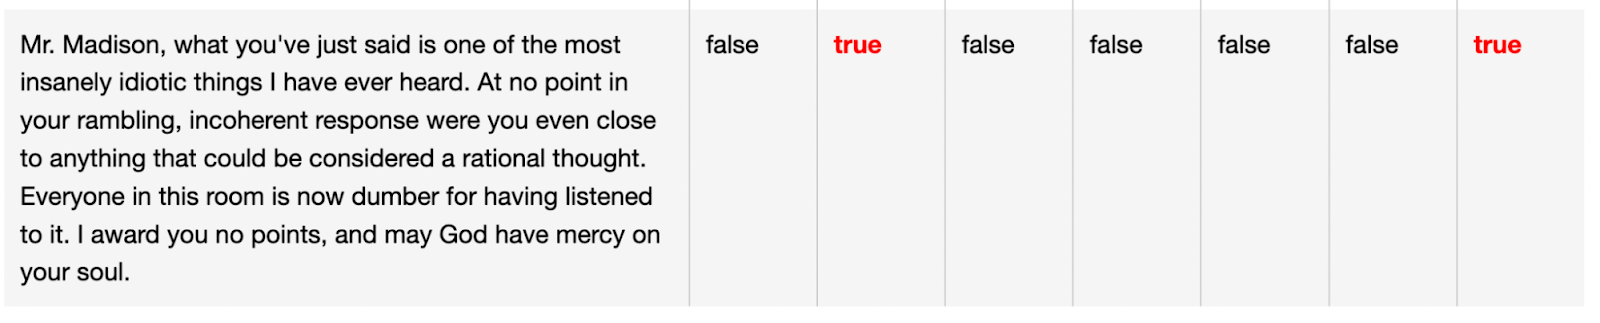
There is an existing pretrained model that works well for content moderation: the TensorFlow.js text toxicity classifier model. With this model, you can evaluate text on different labels of unwanted content, including identity attacks, insults, and obscenity. You can try out the demo to see the classifier in action. I admit that I had a bit of fun testing out what sort of content would be flagged as harmful. For example:
I recommend stopping here and playing around with the text toxicity classifier demo. It's a good idea to see what categories of text the model checks for and determine which ones you would want to filter from your own website. Besides, if you want to know what categories the above quote got flagged for, you'll have to go to the demo to read the headings.
Once you've hurled sufficient insults at the text toxicity classifier model, come back to this blog post to find out how to use it in your own code.
This started as a single tutorial with client and server-side code, but it got a bit lengthy so I decided to split it up. Separating the tutorials also makes it easier to target the part that interests you if you just want to implement one part. In this post, I cover the implementation steps for client-side moderation with TensorFlow.js using a basic website. In part 2, I show how to implement the same model server-side using Cloud Functions for Firebase.
Moderating content client-side provides a quicker feedback loop for your users, allowing you to stop harmful discourse before it starts. It can also potentially save on backend costs since inappropriate comments don't have to be written to the database, evaluated, and then subsequently removed.
I used the Firebase text moderation example as the foundation of my demo website. It looks like this:
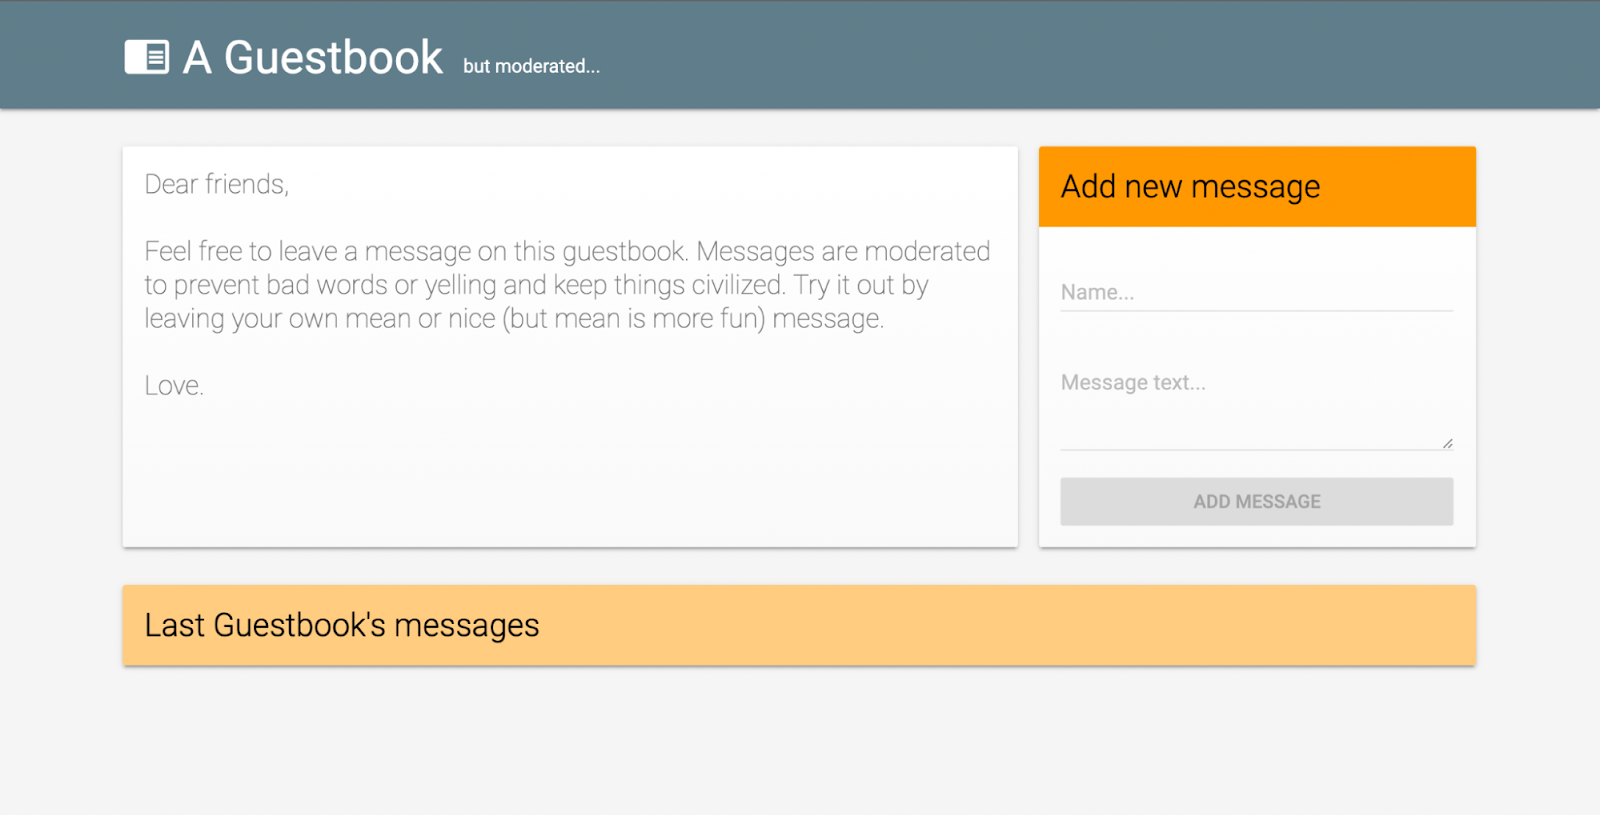
Keep in mind TensorFlow.js doesn't require Firebase. You can use whatever hosting, database, and backend solutions that work best for your app's needs. I just tend to use Firebase because I'm pretty familiar with it already. And quite frankly, TensorFlow.js and Firebase work well together! The website in the Firebase demo showcases content moderation through a basic guestbook using a server-side content moderation system implemented through a Realtime Database-triggered Cloud Function. Don't worry if this sounds like a lot of jargon. I'll walk you through the specifics of what you need to know to use the TensorFlow.js model in your own code. That being said, if you want to build this specific example I made, it's helpful to take a look at the Firebase example on GitHub.
If you're building the example with me, clone the Cloud Functions samples repo. Then change to the directory of the text moderation app.
This project requires you to have the Firebase CLI installed. If you don't have it, you can install it using the following npm command:
Once installed, use the following command to log in:
Run this command to connect the app to your Firebase project:
From here, you can select your project in the list, connect Firebase to an existing Google Cloud project, or create a new Firebase project. Once the project is configured, use the following command to deploy Realtime Database security rules and Firebase Hosting:
There is no need to deploy Cloud Functions at this time since we will be changing the sample code entirely.
Note that the Firebase text moderation sample as written uses the Blaze (pay as you go) plan for Firebase. If you choose to follow this demo including the server-side component, your project might need to be upgraded from Spark to Blaze. If you have a billing account set on your project through Google Cloud, you are already upgraded and good to go! Most importantly, if you're not ready to upgrade your project, then do not deploy the Cloud Functions portion of the sample. You can still use the client-side moderation without Cloud Functions.
To implement client-side moderation in the sample, I added some code to the index.html and main.js files in the Firebase text moderation example. There are three main steps to implement when using a TensorFlow.js model: installing the required components, loading the model, and then running the prediction. Let's add the code for each of these steps.
Add the required TensorFlow.js dependencies. I added the dependencies as script tags in the HTML, but you can use Node.js if you use a bundler/transpiler for your web app.
Add the following code to load the text toxicity model in the Guestbook() function. The Guestbook() function is part of the original Firebase sample. It initializes the Guestbook components and is called on page load.
The threshold of the model is the minimum prediction confidence you want to use to set the model's predictions to true or false--that is, how confident the model is that the text does or does not contain the given type of toxic content. The scale for the threshold is 0-1.0. In this case, I set the threshold to .9, which means the model will predict true or false if it is 90% confident in its findings. It is up to you to decide what threshold works for your use case. You may even want to try out the text toxicity classifier demo with some phrases that could come up on your website to determine how the model handles them.
toxicity.load loads the model, passing the threshold. Once loaded, it sets toxicity_model to the model value.
Add a checkContent function that runs the model predictions on messages upon clicking "Add message":
This function does the following:
toxicity_model has a value, then the load() function has finished loading the model.
messages, as an array is the object type that the classify function accepts.
classify on the messages array.
predictions is an array of objects each representing a different language label. You may want to know about only specific labels rather than iterating through them all. For example, if your use case is a website for hosting the transcripts of rap battles, you probably don't want to detect and remove insults.
match value is true, then the model has detected the given type of unwanted language. If the unwanted language is detected, the function returns true. There's no need to keep checking the rest of the results, since the content has already been deemed inappropriate.
true, then the function returns false – meaning no undesirable language was found. The match label can also be null. In that case, its value isn't true, so it's considered acceptable language. I will talk more about the null option in a future post.
Add a call to the checkContent in the saveMessage function:
After a couple quick checks for input values, the contents of the message box is passed to the checkContent function.
If the content passes this check, the message is written to the Realtime Database. If not, a snack bar displays reminding the message author to be kind. The snack bar isn't anything special, so I'm not going to include the code here. You can see it in the full example code, or implement a snack bar of your own.
If you've been following along in your own code, run this terminal command in your project folder to deploy the website:
 | ||
A message that's not acceptable gets rejected
| ||
Verifying that this code was working properly was really uncomfortable. I had to come up with an insult that the model would deem inappropriate, and then keep writing it on the website. From my work computer. I know nobody could actually see it, but still. That was one of the stranger parts of my job, to be sure! Next steps |


August 19, 2022 — Posted by Jen Person, Developer AdvocateBeing kind: a perennial problem I've often wondered why anonymity drives people to say things that they'd never dare say in person, and it’s unfortunate that comment sections for videos and articles are so often toxic! If you’re interested in content moderation, you can use machine learning to help detect toxic posts which you consider for removal.�…


