https://blog.tensorflow.org/2022/09/automated-deployment-of-tensorflow-models-with-tensorflow-serving-and-github-actions.html?hl=ca
https://blogger.googleusercontent.com/img/b/R29vZ2xl/AVvXsEj6g9FPO3ZE-4rsM-yQ4JpMLg4NX4srfqKg8dudM4-gFz27p4eoDmpEIdv3ZVYEydArXWTx9NvdQ-VQ_h_8ZTYEcNyMMd9vc_x_BOy9AAQGTXJL--8JUcAKd4CJseNgV26AYsmnfrCWAPGs0Y5MDjSSVZ5HS5gUI_5Oxe9NzGNI9xNQGwxnICOwMPXS/s1600/Screen-Shot-2022-07-09-at-9-26-47-AM.png
Automated Deployment of TensorFlow Models with TensorFlow Serving and GitHub Actions
Posted by Chansung Park and Sayak Paul (ML-GDEs)

If you are an applications developer, or if your organization doesn’t have a dedicated ML Engineering team, it is common to deploy a machine learning model without worrying about the end to end machine learning pipeline or MLOps. TFX and TensorFlow Serving can help you create the heart of an MLOps infrastructure.
In this post, we will share how we serve a TensorFlow image classification model as RESTful and gRPC based services with TensorFlow Serving on a Kubernetes (k8s) cluster running on Google Kubernetes Engine (GKE) through a set of GitHub Actions workflows.
Overview
In any GitHub project, you can make releases, with up to 2 GB of assets included in each release when using a free account. This is a good place to manage different versions of machine learning models for various reasons. One can also replace this with a more private component for managing model versions such as Google Cloud Storage buckets. For our purposes, the 2 GB space provided by GitHub Releases will be enough.
 |
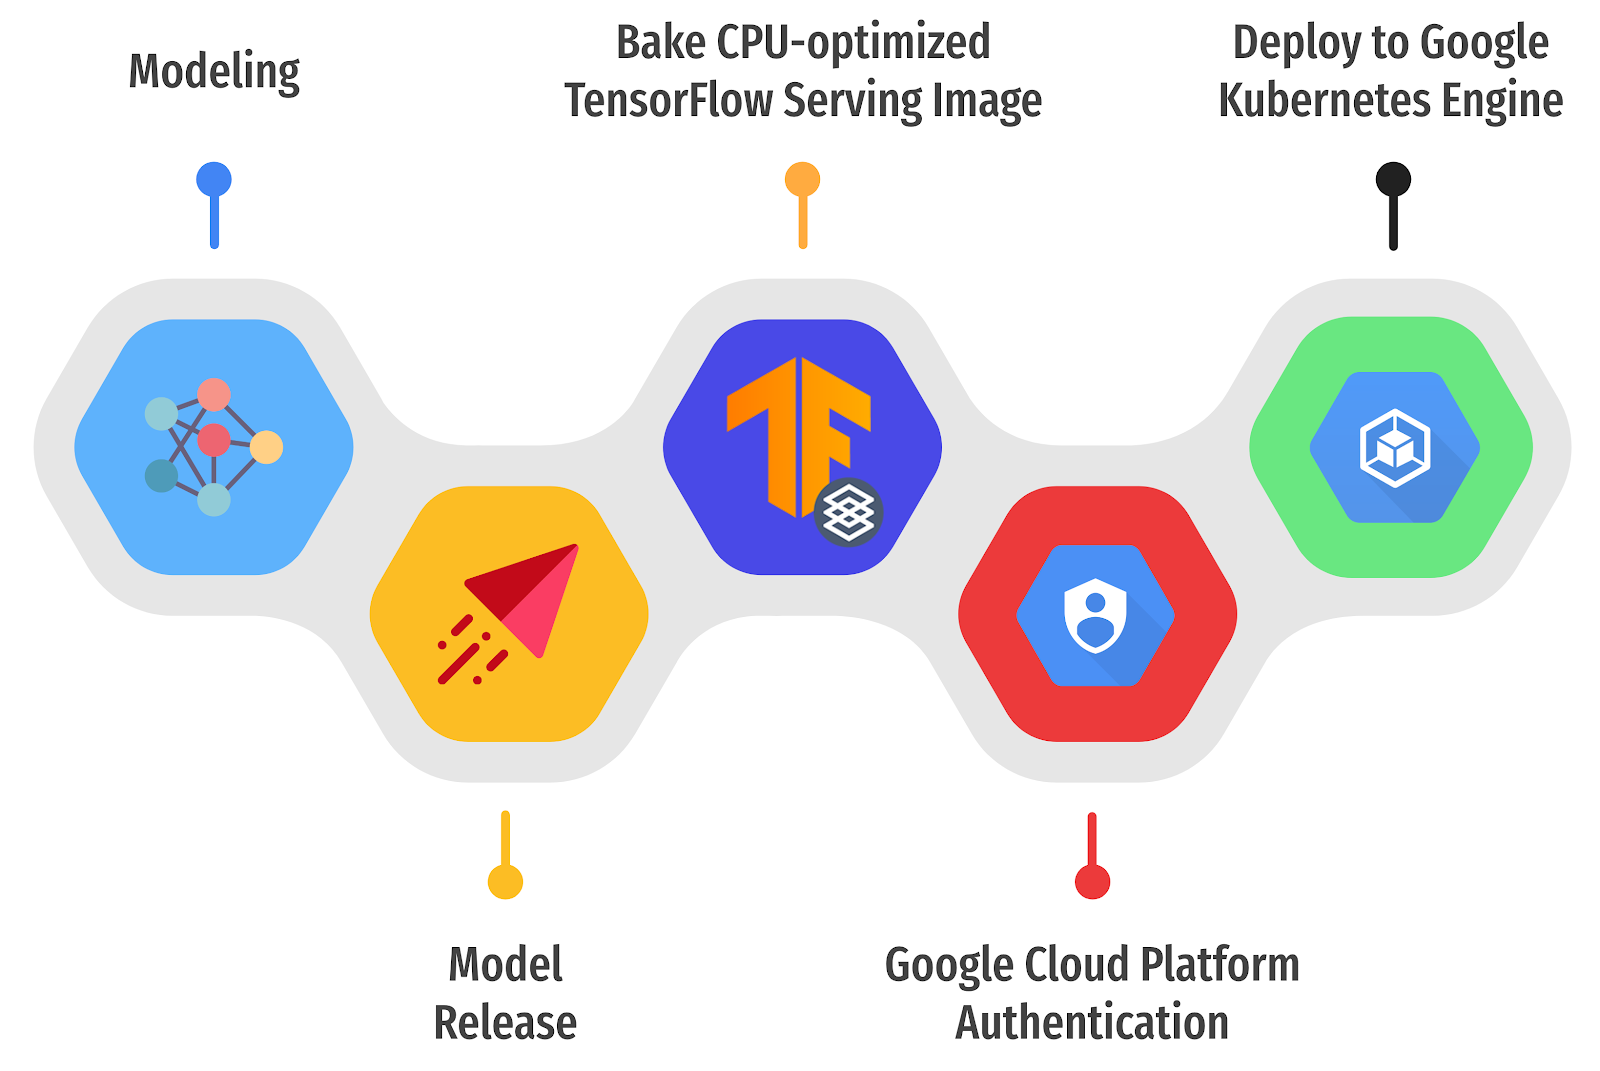
Figure 1. Three steps to deploy TF Serving on GKE (original).
|
The basic idea is to:
- Automatically detect a newly released version of a TensorFlow-based ML model in GitHub Releases
- Build a custom TensorFlow Serving Docker image containing the released ML model
- Deploy it on a k8s cluster running on GKE through a set of GitHub Actions.
The entire workflow can be logically divided into three subtasks, so it’s a good idea to write three separate
composite GitHub Actions:
- First subtask handles the environmental setup
- GCP Authentication (GCP credentials are injected from the GitHub Action Secret)
- Install gcloud CLI toolkit to access the GKE cluster for the third subtask
- Authenticate Docker to push images to the Google Cloud Registry (GCR)
- Connect to a designated GKE cluster for further accesses
- Second subtask builds a custom TensorFlow Serving image
- Download and extract your latest released SavedModel from your GitHub repository
- Run the official or a custom built TensorFlow Serving docker image
- Copy the extracted SavedModel into the running TensorFlow Serving docker container
- Commit the changes of the running container and give it a new name with the tags of special token to denote GCR, GCP project ID, and latest
- Push the committed image to the GCR
- Third subtask deploys the custom built TensorFlow Serving image to the GKE cluster
- Download the Kustomize toolkit to handle overlay configurations
- Pick one of the scenarios from the various experiments
- Apply Deployment, Service, and ConfigMap according to the selected experiment to the currently connected GKE cluster
- ConfigMap is used for batching-enabled scenarios to inject batching configurations dynamically into the Deployment.
There are a number of parameters that you can customize such as the GCP project ID, GKE cluster name, the repository where the ML model will be released, and so on. The full list of parameters can be found
here. As noted above, the GCP credentials should be set as a GitHub Action Secret beforehand. If the entire workflow goes without any errors, you will see something similar to the output below.
NAME TYPE CLUSTER-IP EXTERNAL-IP PORT(S) AGE
tfs-server LoadBalancer xxxxxxxxxx xxxxxxxxxx 8500:30869/TCP,8501:31469/TCP 23m |
The combinations of the
EXTERNAL-IP and the
PORT(S) represent endpoints where external users can connect to the TensorFlow Serving pods in the k8s cluster. As you see, two ports are exposed, and
8500 and
8501 are for RESTful and gRPC services respectively. One thing to note is that we used
LoadBalancer as the service type, but you may want to consider including
Ingress controllers such as
GKE Ingress for securing the k8s clusters with SSL/TLS and defining more flexible routing rules in production. You can check out the complete logs from the
past runs.
Build a Custom TensorFlow Serving Image within a GitHub Action
As described in the overview and the official document, a custom TensorFlow Serving Docker image can be built in five steps. We also provide a notebook for local testing of these steps. In this section, we show how to write a composite GitHub Action for this partial subtask of the whole workflow (note that .inputs, .env, and ${{ }} for the environment variables are omitted for brevity).
First, a model can be downloaded by an external robinraju/release-downloader GitHub Action with custom information about the URL of the GitHub repository and the filename in the list of assets from the latest release. The default filename is saved_model.tar.gz.
Second, the downloaded file should be decompressed to fetch the actual SavedModel that TensorFlow Serving can understand.
runs:
using: "composite"
steps:
- name: Download the latest SavedModel release
uses: robinraju/release-downloader@v1.3
with:
repository: $MODEL_RELEASE_REPO
fileName: $MODEL_RELEASE_FILE latest: true
- name: Extract the SavedModel
run: |
mkdir MODEL_NAME
tar -xvf $MODEL_RELEASE_FILE --strip-components=1 --directory $MODEL_NAME
- name: Run the CPU Optimized TensorFlow Serving container
run: |
docker run -d --name serving_base $BASE_IMAGE_TAG
- name: Copy the SavedModel to the running TensorFlow Serving container
run: |
docker cp $MODEL_NAME serving_base:/models/$MODEL_NAME
- id: push-to-registry
name: Commit and push the changed running TensorFlow Serving image
run: |
export NEW_IMAGE_NAME=tfserving-$MODEL_NAME:latest
export NEW_IMAGE_TAG=gcr.io/$GCP_PROJECT_ID/$NEW_IMAGE_NAME
echo "::set-output name=NEW_IMAGE_TAG::$(echo $NEW_IMAGE_TAG)"
docker commit --change "ENV MODEL_NAME $MODEL_NAME" serving_base $NEW_IMAGE_TAG
docker push $NEW_IMAGE_TAG |
Third, we can modify a running TensorFlow Serving Docker container by placing a custom SavedModel inside. In order to do this, we need to run the base TensorFlow Serving container instantiated either from the official image or a custom-built image. We have used the CPU-optimized version as the base image by compiling from source, and it is publicly available here.
Fourth, the SavedModel should be copied to the /models directory inside the running TensorFlow Serving container. In the last step, we set the MODEL_NAME environment variable to let TensorFlow Serving know which model to expose as services, and commit the two changes that we made to the base image. Finally, the updated TensorFlow Serving Docker image can be pushed into the designated GCR.
Notes on the TensorFlow Serving Parameters
We consider three TensorFlow Serving specific parameters in this post:
tensorflow_inter_op_parallelism, tensorlfow_inter_op_parallelism, and the batching option. Here, we provide brief overviews of each of them.
Parallelism threads:
tesorflow_intra_op_parallelism controls the number of threads to parallelize the execution of an individual operation.
tensorflow_inter_op_parallelism controls the number of threads to parallelize the execution of multiple independent operations. To know more, refer to
this resource.
Batching: As mentioned above, we can allow TensorFlow Serving to batch requests by setting the
enable_batching parameter to True. If we do so, we also need to define the batching configurations for TensorFlow in a separate file (passed via the
batching_parameters_file argument). Please refer to
this resource for more information about the options we can specify in that file.
Configuring TensorFlow Serving
Once you have a custom TensorFlow Serving Docker image, you can deploy it with the k8s resource objects:
Deployment and
ConfigMap as shown below. This section shows how to write
ConfigMap to write batching configurations and
Deployment to add TensorFlow Serving specific runtime options. We also show you how to mount the
ConfigMap to inject batching configurations into TensorFlow Serving’s
batching_parameters_file option.
apiVersion: apps/v1 kind: Deployment ...
spec:
containers:
- image: gcr.io/gcp-ml-172005/tfs-resnet-cpu-opt:latest
name: tfs-k8s
imagePullPolicy: Always
args: ["--tensorflow_inter_op_parallelism=2",
"--tensorflow_intra_op_parallelism=8",
"--enable_batching=true",
"--batching_parameters_file=/etc/tfs-config/batching_config.txt"]
...
volumeMounts:
- mountPath: /etc/tfs-config/batching_config.txt
subPath: batching_config.txt
name:
tfs-config
… |
The URI of the custom built TensorFlow Serving Docker image can be specified in spec.containers.image, and the behavior of TensorFlow Serving can be customized by providing arguments in the spec.containers.args in the Deployment. This post shows how to configure three kinds of custom behavior: tensorflow_inter_op_parallelism, tensorflow_intra_op_parallelism, and enable_batching.
apiVersion: v1 kind: ConfigMap
metadata:
name: tfs-config
data:
batching_config.txt: |
max_batch_size { value: 128 }
batch_timeout_micros { value: 0 }
max_enqueued_batches { value: 2 }
num_batch_threads { value: 2 } |
When enable_batching is set to true, we can further customize the batch inference by defining its specific batching-related configurations in a ConfigMap. Then, the ConfigMap can be mounted as a file with spec.containers.volumeMounts, and we can specify which file to look up for the batching_parameters_file argument in Deployment.
Kustomize to Manage Various Experiments
As you see, there are lots of parameters to determine the behavior of TensorFlow Serving, and the optimal values for them are usually found by running experiments. Indeed, we have experimented with various parameters within a number of different environmental setups: different numbers of nodes, different numbers of vCPU cores, and different RAM capacity.
├── base | ├──kustomization.yaml | ├──deployment.yaml | └──service.yaml
└── experiments
├── 2vCPU+4GB+inter_op2 ... ├── 4vCPU+8GB+inter_op2
... ├── 8vCPU+64GB+inter_op2_w_batch | ├──kustomization.yaml | ├──deployment.yaml | └──tfs-config.yaml
... |
We used kustomize to manage the YAML files of various experiments. We keep common YAML files of Deployment and Service in the base directory while having specific YAML files for certain experimental environments and configurations under the experiments directory. With this and kustomize, the contents of the base YAML files could be easily overlaid with different numbers of replicas, different values of tensorflow_inter_op_parallelism, tensorflow_intra_op_parallelism, enable_batching, and batch configurations.
runs:
using: "composite"
steps:
- name: Setup Kustomize
...
- name: Deploy to GKE
working-directory: .kube/
run: |-
./kustomize build experiments/$TARGET_EXPERIMENT | kubectl apply -f - |
Costs
We used the GCP cost estimator for this purpose. Pricing for each experiment configuration was assumed to be live for 24 hours per month (which was sufficient for our experiments).
| Machine Configuration (E2 series) | Pricing (USD)
|
2vCPUs, 4GB RAM, 8 Nodes
| 11.15 |
4vCPUs, 8GB RAM, 4 Nodes
| 11.15 |
8vCPUs, 16GB RAM, 2 Nodes
| 11.15
|
| 8vCPUs, 64GB RAM, 2 Nodes | 18.21 |
Conclusion
In this post, we discussed how to automatically deploy and experiment with an already trained model with various configurations. We leveraged TensorFlow Serving, Kubernetes, and GitHub Actions to streamline the deployment and experiments. We hope that you found this setup useful and reliable and that you will use this in your own model deployment projects.
Acknowledgements


