https://blog.tensorflow.org/2018/08/training-and-serving-ml-models-with-tf-keras.html
https://blogger.googleusercontent.com/img/b/R29vZ2xl/AVvXsEi-CQ1Zlqe0YAH6FMgIhNEjFdwfMdk9qleFdcgxeDRjLc2xezP7VcLIEG0NuTZn6sp1bSLgY2jVJvRU7y0_ptzB8bUMimZ7AxDvin-adTWtgvugzK3_ilf1iSHyzYWqJd4WcOb3oM4COTg/s1600/tensorflowkeras.jpg
Posted by Stijn Decubber, machine learning engineer at ML6.
Keras is a high-level interface for neural networks that runs on top of multiple backends. Its functional API is very
user-friendly, yet flexible enough to build all kinds of applications. Keras quickly gained traction after its introduction and in 2017, the Keras API was integrated into core Tensorflow as
tf.keras. Although
tf.kerasand Keras have separate code bases, they are tightly coupled and with the
updated documentation and
programmer guides as of Tensorflow 1.9,
tf.kerasis clearly
the high level API to look for when building neural networks with Tensorflow.
In this blogpost, we will work through the process of
training,
exporting and
serving a neural network with
tf.keras. As an example, we will train a convolutional neural network on the Kaggle Planet dataset to predict labels for satellite images of the Amazon forest. The goal is to illustrate an end-to-end pipeline for a real-world use case. The code is available as a runable notebook on
github.
Note that you’ll need to install the latest version of TensorFlow, 1.11.0 (nightly build), to follow along until the end. This is simply a pip install and requirements.txt file is available on the repo. Alternatively, you can run it out of the box on Google Colab!
The data is available for download on
Kaggle. The training data consists of approximately 40000 labeled images of the Amazon rain forest. Each image is associated with multiple labels:
- Exactly one ‘weather’ label: clear, haze, cloudy or partly cloudy
- One or more ‘ground’ labels: agriculture, bare ground, habitation, road, water…
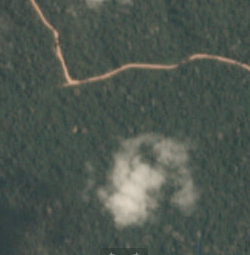 |
| Weather label: cloudy. Ground labels: primary forest, road. |
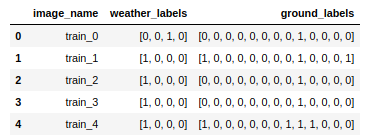
A Pandas DataFrame with columns for the image names and the weather and ground labels encoded as binary vectors is available as a .csv file on
github:
We want to train a model that can accurately predict these labels for new images. We’ll try to do this with a network that has
two separate outputs for the weather and the ground labels. Predicting the weather labels is an example of a
multi-class classification problem, whereas the ground labels can be modeled as a
multi-label classification problem. Therefore, the loss function for both outputs will be different. After the model is trained, we will
export it and serve it with TensorFlow Serving, so that we can send requests over HTTP to get predictions for our images.
. . .
Specifying the model
We will build our own model from scratch¹. We will go for a fairly classical configuration with some convolutional layers, relu activations and two dense classifiers on top:
import tensorflow as tf
IM_SIZE = 128

image_input = tf.keras.Input(shape=(IM_SIZE, IM_SIZE, 3), name='input_layer')

# Some convolutional layers
conv_1 = tf.keras.layers.Conv2D(32,
                                kernel_size=(3, 3),
                                padding='same',
                                activation='relu')(image_input)
conv_1 = tf.keras.layers.MaxPooling2D(padding='same')(conv_1)
conv_2 = tf.keras.layers.Conv2D(32,
                                kernel_size=(3, 3),
                                padding='same',
                                activation='relu')(conv_1)
conv_2 = tf.keras.layers.MaxPooling2D(padding='same')(conv_2)

# Flatten the output of the convolutional layers
conv_flat = tf.keras.layers.Flatten()(conv_2)

# Some dense layers with two separate outputs
fc_1 = tf.keras.layers.Dense(128,
                             activation='relu')(conv_flat)
fc_1 = tf.keras.layers.Dropout(0.2)(fc_1)
fc_2 = tf.keras.layers.Dense(128,
                             activation='relu')(fc_1)
fc_2 = tf.keras.layers.Dropout(0.2)(fc_2)

# Output layers: separate outputs for the weather and the ground labels
weather_output = tf.keras.layers.Dense(4,
                                       activation='softmax',
                                       name='weather')(fc_2)
ground_output = tf.keras.layers.Dense(13,
                                      activation='sigmoid',
                                      name='ground')(fc_2)

# Wrap in a Model
model = tf.keras.Model(inputs=image_input, outputs=[weather_output, ground_output])
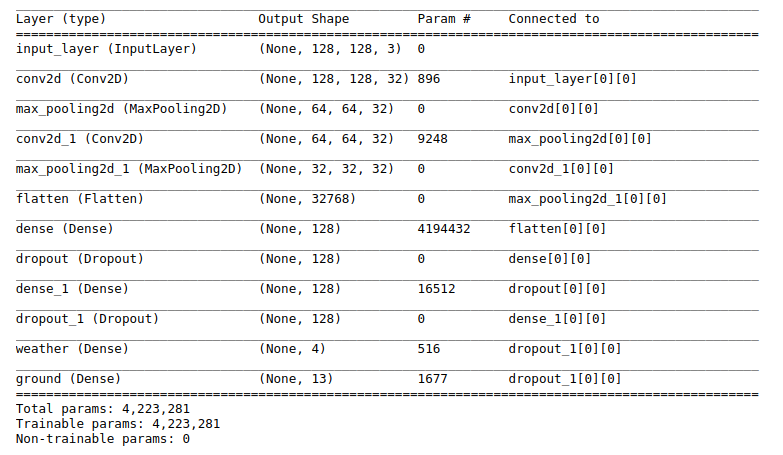
We have two output layers, so these should be passed as a list of outputs when specifying the model. Note the different activation functions for the weather and the ground output layers. Conveniently, the
tf.kerasimplementation of
Model comes with the handy
summary()method:
Upon compiling the model, the two different loss functions can be provided as a dictionary that maps tensor names to losses:
model.compile(optimizer='adam',
              loss={'weather': 'categorical_crossentropy',
                    'ground': 'binary_crossentropy'})
Compiling a model initializes it with random weights and also allows us to choose an optimization algorithm for training the network.
[1] As it turned out during the Kaggle competition, transfer learning with large pretrained networks was one of the keys to success. Beating Kaggle is not the focus here. For tips on how to achieve a top-of-the-leaderboard performance, check out the great fast.ai lecture that handles this dataset.
. . .
Model training
Let’s train the model! I will be training this model on my laptop, which does not have enough RAM to take the entire dataset into memory. With image data, this is very often the case. Keras provides the
model.fit_generator() method that can use a custom Python generator yielding images from disc for training. However, as of Keras 2.0.6, we can use the
Sequence object instead of a generator which allows for safe multiprocessing which means significant speedups and less risk of bottlenecking your GPU if you have one. The Keras documentation already provides good example code, which I will customize a bit to:
- make it work with a dataframe that maps image names to labels
- shuffle the training data after every epoch
import ast
import numpy as np
import math
import os
import random
from tensorflow.keras.preprocessing.image import img_to_array as img_to_array
from tensorflow.keras.preprocessing.image import load_img as load_img

def load_image(image_path, size):
    # data augmentation logic such as random rotations can be added here
    return img_to_array(load_img(image_path, target_size=(size, size))) / 255.

class KagglePlanetSequence(tf.keras.utils.Sequence):
    """
    Custom Sequence object to train a model on out-of-memory datasets.
    """

    def __init__(self, df_path, data_path, im_size, batch_size, mode='train'):
        """
        df_path: path to a .csv file that contains columns with image names and labels
        data_path: path that contains the training images
        im_size: image size
        mode: when in training mode, data will be shuffled between epochs
        """
        self.df = pd.read_csv(df_path)
        self.im_size = im_size
        self.batch_size = batch_size
        self.mode = mode

        # Take labels and a list of image locations in memory
        self.wlabels = self.df['weather_labels'].apply(lambda x: ast.literal_eval(x)).tolist()
        self.glabels = self.df['ground_labels'].apply(lambda x: ast.literal_eval(x)).tolist()
        self.image_list = self.df['image_name'].apply(lambda x: os.path.join(data_path, x + '.jpg')).tolist()

    def __len__(self):
        return int(math.ceil(len(self.df) / float(self.batch_size)))

    def on_epoch_end(self):
        # Shuffles indexes after each epoch
        self.indexes = range(len(self.image_list))
        if self.mode == 'train':
            self.indexes = random.sample(self.indexes, k=len(self.indexes))

    def get_batch_labels(self, idx):
        # Fetch a batch of labels
        return [self.wlabels[idx * self.batch_size: (idx + 1) * self.batch_size],
                self.glabels[idx * self.batch_size: (idx + 1) * self.batch_size]]

    def get_batch_features(self, idx):
        # Fetch a batch of images
        batch_images = self.image_list[idx * self.batch_size: (1 + idx) * self.batch_size]
        return np.array([load_image(im, self.im_size) for im in batch_images])

    def __getitem__(self, idx):
        batch_x = self.get_batch_features(idx)
        batch_y = self.get_batch_labels(idx)
        return batch_x, batch_y
This
Sequence object can be used instead of a custom generator together with
fit_generator()to train the model. Note that there is no need to provide the number of steps per epoch, since the
__len__method implements that logic for the generator.
seq = KagglePlanetSequence('./KagglePlanetMCML.csv',
                       './data/train/',
                       im_size=IM_SIZE,
                       batch_size=32)
Furthermore,
tf.keras provides access to all the available Keras callbacks that can be used to enhance the training loop. These can be quite powerful and provide options for early stopping, learning rate scheduling, storing files for TensorBoard… Here, we will use the
ModelCheckPointcallback to save the model after every epoch so that we can pick up training afterwards if we want. By default, the model architecture, training configuration, state of the optimizer and the weights are stored, such that the entire model can be recreated from a single file.
Let’s train the model for a single epoch:
callbacks = [
    tf.keras.callbacks.ModelCheckpoint('./model.h5', verbose=1)
]

model.fit_generator(generator=seq,
                    verbose=1,
                    epochs=1,
                    use_multiprocessing=True,
                    workers=4,
                    callbacks=callbacks)
Epoch 1/1
Epoch 00001: saving model to ./model.h5
1265/1265 [==============================] - 941s 744ms/step - loss: 0.8686 - weather_loss: 0.6571 - ground_loss: 0.2115
Let’s train the model for a single epoch:
Suppose that we want to finetune the model in a later stage, we can simply read the model file and pick up training without recompiling:
another_model = tf.keras.models.load_model('./model.h5')
another_model.fit_generator(generator=seq, verbose=1, epochs=1)
Finally, it’s good to verify that our
Sequence effectively passes over all the data by instantiating a
Sequence in test mode (that is, without shuffling) and using it to make predictions for the entire dataset:
test_seq = KagglePlanetSequence('./KagglePlanetMCML.csv',
                       './data/train/',
                       im_size=IM_SIZE,
                       batch_size=32, mode='test')
predictions = model.predict_generator(generator=test_seq, verbose=1)
len(predictions[1])  == len(df_train) # This is True!
Wait, what about the Dataset API?
The
tf.data API is a powerful library that allows to consume data from various sources and pass it to TensorFlow models. Can we train our
tf.keras model using the
tf.data API instead of with the
Sequence object? Yes. First of all, let’s serialize the images and labels together into a
TFRecord file, which is the recommended format for serializing data in TensorFlow:
# Serialize images, together with labels, to TF records
def _bytes_feature(value):
    return tf.train.Feature(bytes_list=tf.train.BytesList(value=[value]))

tf_records_filename = './data/KagglePlanetTFRecord_{}'.format(IM_SIZE)
writer = tf.python_io.TFRecordWriter(tf_records_filename)

# List of image paths, np array of labels
im_list = [os.path.join('./data/train', v + '.jpg') for v in df_train['image_name'].tolist()]
w_labels_arr = np.array([ast.literal_eval(l) for l in df_train['weather_labels']])
g_labels_arr = np.array([ast.literal_eval(l) for l in df_train['ground_labels']])

# Loop over images and labels, wrap in TF Examples, write away to TFRecord file
for i in range(len(df_train)):
    w_labels = w_labels_arr[i].astype(np.float32)
    g_labels = g_labels_arr[i].astype(np.float32)
    im = np.array(img_to_array(load_img(im_list[i], target_size=(IM_SIZE, IM_SIZE))) / 255.)

    example = tf.train.Example(features=tf.train.Features(feature={'image': _bytes_feature(im.tostring()),
                                                                  'weather_labels': _bytes_feature(w_labels.tostring()),
                                                                  'ground_labels': _bytes_feature(g_labels.tostring())}))

    writer.write(example.SerializeToString())

writer.close()
After dumping the images and the labels into a
TFRecordfile, we can come up with another generator using the
tf.dataAPI. The idea is to instantiate a
TFRecordDatasetfrom our file and tell it how to parse the serialized data using the
map()operation.
featdef = {
           'image': tf.FixedLenFeature(shape=[], dtype=tf.string),
           'weather_labels': tf.FixedLenFeature(shape=[], dtype=tf.string),
           'ground_labels': tf.FixedLenFeature(shape=[], dtype=tf.string)
          }

 def _parse_record(example_proto, clip=False):
    """Parse a single record into image, weather labels, ground labels"""
    example = tf.parse_single_example(example_proto, featdef)
    im = tf.decode_raw(example['image'], tf.float32)
    im = tf.reshape(im, (IM_SIZE, IM_SIZE, 3))
    weather = tf.decode_raw(ex['weather_labels'], tf.float32)
    ground = tf.decode_raw(ex['ground_labels'], tf.float32)
    return im, weather, ground

# Construct a TFRecordDataset
ds_train = tf.data.TFRecordDataset('./data/KagglePlanetTFRecord_{}'.format(IM_SIZE)).map(_parse_record)
ds_train = ds_train.shuffle(1000).batch(32)
Dataset objects provide multiple methods to produce iterator objects to loop over the data. However, as of TensorFlow 1.9, we can simply pass our
ds_train directly to
model.fit() to train the model:
model = tf.keras.Model(inputs=image_input, outputs=[weather_output, ground_output])

model.compile(optimizer='adam',
              loss={'weather': 'categorical_crossentropy',
                    'ground': 'binary_crossentropy'})

history = model.fit(ds_train,
                    steps_per_epoch=100, # let's take just a couple of steps
                    epochs=1)
Epoch 1/1
100/100 [==============================] - 76s 755ms/step - loss: 0.5460 - weather_loss: 0.3780 - ground_loss: 0.1680
Works nicely. This way of working opens up
tf.keras for people who are used to working with
TFRecords. If you want use validation data, you can just instantiate another
Dataset with validation data and pass that as well to
model.fit().
. . .
Serving the model
What is model serving? What we want is this: on the client side, we have an input image. We want to wrap this image in some kind of message, send it to a remote server that is hosting our trained model, and finally receive the prediction as a response from the server.
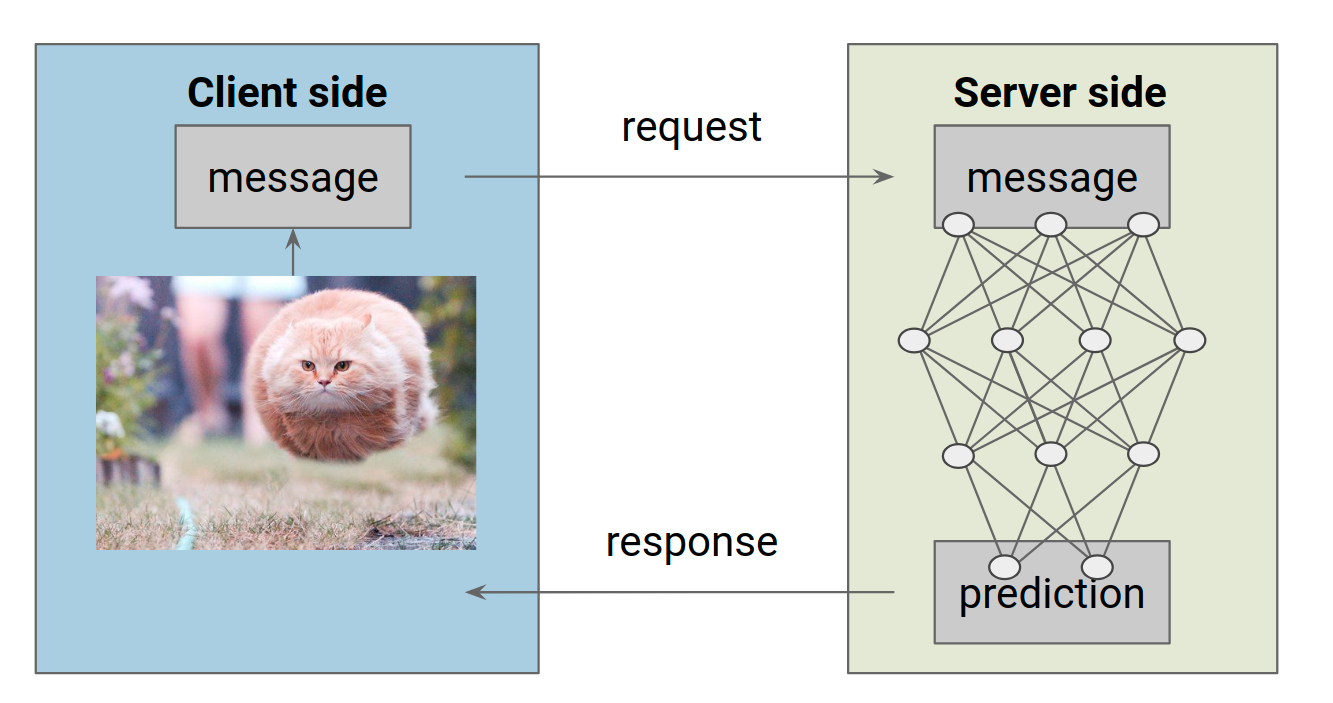 |
| Serving a ML model: the client sends a request with an input, the server fetches the prediction from the model and sends it back as a response. |
First of all, we want to export our model in a format that the server can handle. TensorFlow provides the
SavedModel format as a universal format for exporting models. Under the hood, our
tf.keras model is fully specified in terms of TensorFlow objects, so we can export it just fine using Tensorflow methods.
The main idea behind exporting a model is to specify an inference computation via a signature definition. A
SignatureDef is fully specified in terms of input and output tensors and is eventually stored together with the model weights. However, TensorFlow provides a convenience function
tf.saved_model.simple_save() which abstracts away some of these details and works fine for most use cases:
import tensorflow as tf

# The export path contains the name and the version of the model
tf.keras.backend.set_learning_phase(0) # Ignore dropout at inference
model = tf.keras.models.load_model('./model.h5')
export_path = './PlanetModel/1'

# Fetch the Keras session and save the model
# The signature definition is defined by the input and output tensors
# And stored with the default serving key
with tf.keras.backend.get_session() as sess:
    tf.saved_model.simple_save(
        sess,
        export_path,
        inputs={'input_image': model.input},
        outputs={t.name:t for t in model.outputs})
INFO:tensorflow:No assets to save.
INFO:tensorflow:No assets to write.
INFO:tensorflow:SavedModel written to: ./PlanetModel/1/saved_model.pb
Note that I specified a version number in my export path. The reason for this is that
TensorFlow Serving infers the model version from the name of the directory it is stored in. If we ever come up with a better model, we can store it under
PlanetModel/2 and TF Serving will automatically update to host the new model. The model graph is stored in the version subdirectory, with the variables in another subdirectory:
$ tree
.
└── 1
    ├── saved_model.pb
    └── variables
        ├── variables.data-00000-of-00001
        └── variables.index
Before setting up the actual server, I’d like to highlight TensorFlow’s
SavedModel command line tool, which is useful to quickly inspect the input and output specifications of our model:
$ saved_model_cli show --dir ./ --all
The given SavedModel SignatureDef contains the following input(s):
  inputs['input_image'] tensor_info:
      dtype: DT_FLOAT
      shape: (-1, 128, 128, 3)
      name: input_layer_2:0
The given SavedModel SignatureDef contains the following output(s):
  outputs['ground_2/Sigmoid:0'] tensor_info:
      dtype: DT_FLOAT
      shape: (-1, 13)
      name: ground_2/Sigmoid:0
  outputs['weather_2/Softmax:0'] tensor_info:
      dtype: DT_FLOAT
      shape: (-1, 4)
      name: weather_2/Softmax:0
Method name is: tensorflow/serving/predict
We even have access to numpy within the CLI (as
np) to send some random input to the model to verify that it works:
$ saved_model_cli run --dir ./ --tag_set serve --signature_def serving_default --input_exp 'input_image=np.random.rand(1,128,128,3)'
Result for output key ground_2/Sigmoid:0:
[[6.5955728e-01 9.8123280e-03 1.4992488e-02 1.9942504e-06 3.5892407e-07
  3.2538961e-04 2.4094069e-02 6.0808718e-01 9.8486900e-01 7.9137814e-01
  1.4336356e-05 1.6872218e-05 3.8697788e-01]]
Result for output key weather_2/Softmax:0:
[[7.1896911e-01 2.9373894e-04 2.5214682e-05 2.8071195e-01]]
Seems to work!
. . .
Hosting a model server with TensorFlow Serving
We will use the
TensorFlow Serving library to host the model:
TensorFlow Serving is a flexible, high-performance serving system for machine learning models, designed for production environments.
Servables are the core abstraction in TensorFlow Serving and will represent out model. Apart from that, TF Serving provides
Sources,
Loaders and
Managers that handle the actual serving, loading of new versions and unloading of old versions.
For this tutorial, we will set up a server locally. In a production environment, you could set the server up in exactly the same way in some microservice architecture, for example on a pod in a Kubernetes cluster.
Hosting the model from within the top model directory requires just a single command. I truncated some of the output, and highlighted some of the components from the TF Serving backend below:
$ tensorflow_model_server --model_base_path=$(pwd) --rest_api_port=9000 --model_name=PlanetModel
I tensorflow_serving/core/basic_manager] Successfully reserved resources to load servable {name: PlanetModel version: 1}
I tensorflow_serving/core/loader_harness.cc] Loading servable version {name: PlanetModel version: 1}
I external/org_tensorflow/tensorflow/cc/saved_model/loader.cc] Loading SavedModel with tags: { serve };
I external/org_tensorflow/tensorflow/cc/saved_model/loader.cc] SavedModel load for tags { serve }; Status: success. Took 1048518 microseconds.
I tensorflow_serving/core/loader_harness.cc] Successfully loaded servable version {name: PlanetModel version: 1}
I tensorflow_serving/model_servers/main.cc] Exporting HTTP/REST API at:localhost:9000 ...
With the server up and running, we can make requests to it. As of TensorFlow Serving 1.8, it’s possible to call a hosted model either via gRPC or via HTTP. In both cases, the idea is the same: we want to populate a payload message and send it to the server, which should return a message that contains the prediction. For gRPC, there are python bindings available to populate the message in the form of a protobuf file. To send an HTTP request, we can simply use the python
requests module to wrap our input in a payload json:
import requests
import json

image = img_to_array(load_img('./data/train/train_10001.jpg', target_size=(128,128))) / 255.
payload = {
  "instances": [{'input_image': image.tolist()}]
}
r = requests.post('http://localhost:9000/v1/models/PlanetModel:predict', json=payload)
json.loads(r.content)
The request url is composed according to some rules which are described in in the TF Serving docs. After sending the request, the server returns a list of outputs for the weather and the ground labels within milliseconds:
{u'predictions': [
     {u'ground_2/Sigmoid:0': [
        0.153237,
        0.000527727,
        0.00555856,
        0.00542973,
        0.00105254,
        0.000256282,
        0.103614,
        0.0325185,
        0.998204,
        0.072204,
        0.00745501,
        0.00326175,
        0.0942268],
   u'weather_2/Softmax:0': [
        0.963947,
        0.000207846,
        0.00113924,
        0.0347063]
     }]}
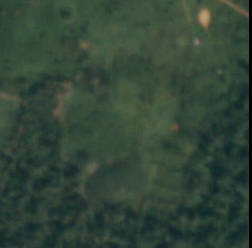 |
| Prediction: primary forest with a clear sky, but missed the agriculture and the road. Back to training! |
. . .
Summary
Tf.keras brings the full power and flexibility of Keras to TensorFlow users. It’s a joy to work with and its integration in core TensorFlow is definitely a big step towards making deep learning accessible to a larger audience. The fact that they can be exported to the
SavedModel format and served with TensorFlow Serving just like any other TF model makes it straightforward to use
tf.keras in production environments.
If you want to get started with
tf.keras,make sure to check out the updated TensorFlow tutorials at
https://www.tensorflow.org/tutorials/. For TensorFlow Serving, I recommend to have a look at the
online docs and also at
github.


